Sierra 14ers
This summer, I was invited to attend the Randomized Numerical Linear Algebra Research Collaboration Workshop at the University of California, Los Angeles, where we investigated low rank approximation techniques for the attention mechanism of pre-trained transformer models.
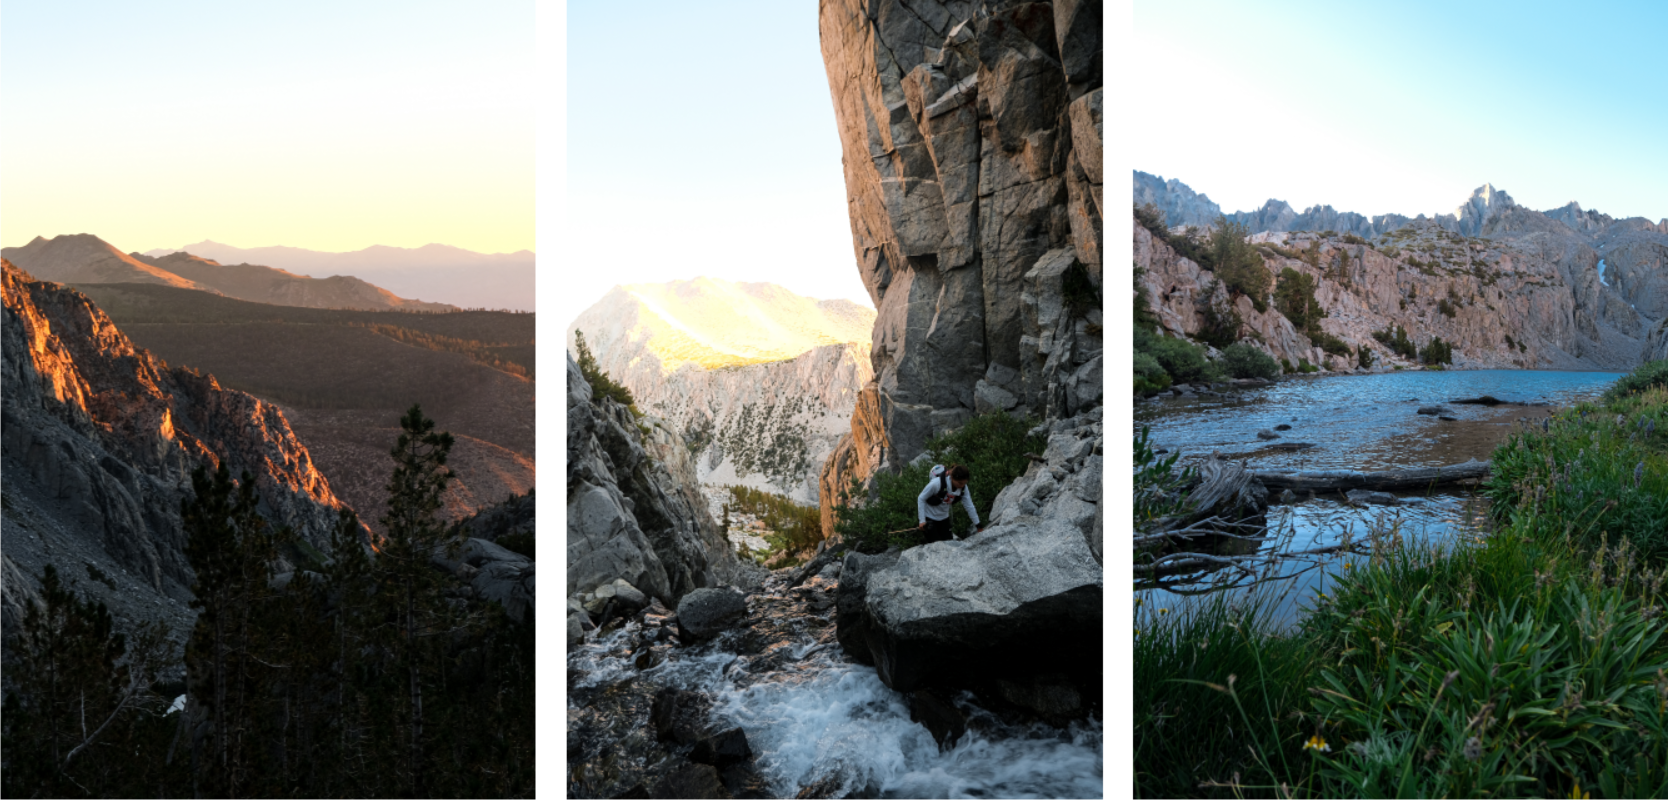
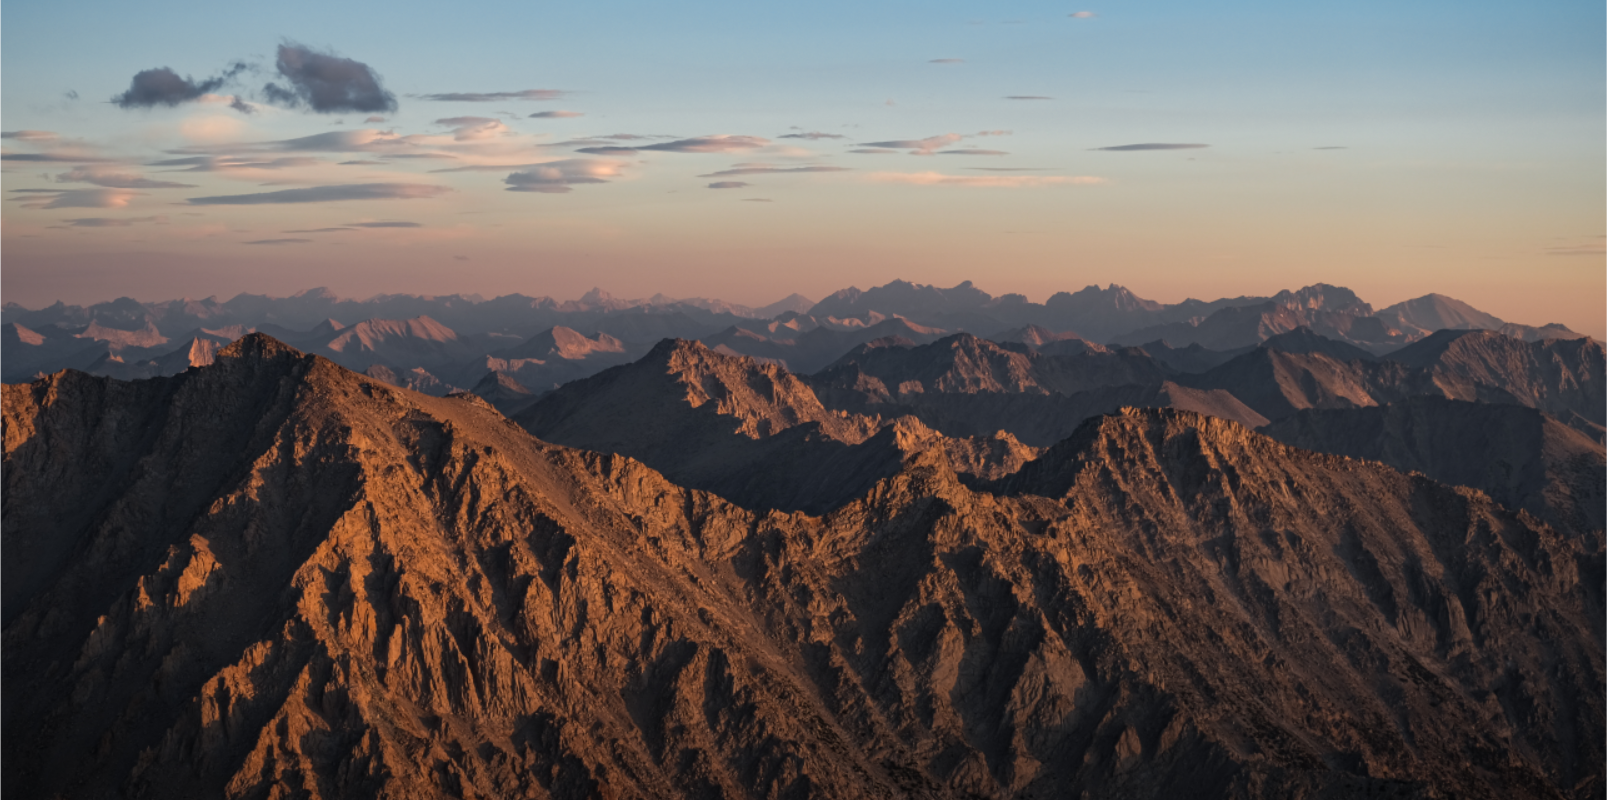
To make good use of my visit to the US, I once again extended my stay by a week to pursue another mountaineering project. This time, the destination was the Sierra Nevada mountain range, particularly, its so-called 14ers — the 12 mountains which are more than 14’000 feet (4’267m) high. Because summiting all of them in one week would not be possible, the goal was to climb the 7 southernmost1 14ers of the Sierras, including the highest mountain of the US mainland: the 4’421m (14’505ft) high Mount Whitney.
I was extremely happy when Nathalie, a good friend of mine, agreed to attempt this project with me right before the start of her PhD at the MIT. Her experience and perseverance enabled the planning and execution of this project to proceed flawlessly, and to develop into an unforgettable experience.
Preparation
As simple as climbing 7 mountains may sound, it required a surprising amount of planning. Given the remoteness of the mountains, trying to optimize the logistics and the itineraries was crucial for accomplishing all the goals we have set ourselves.
Planning
We established a rough plan for every day. Besides removing the planned rest-day in the middle of the trip to make sure to finish before the thunderstorm forecasted to hit on Friday before noon, we could stick to our original schedule:
| Date | Activity | Distance | Elevation change | Time |
|---|---|---|---|---|
| Sat, Aug 16 | Drive to Sierras and preparation | |||
| Sun, Aug 17 | Mount Langley | 37km | +/-1’500m | 10h30 |
| Mon, Aug 18 | Mount Russell (to bivouac) | 12km | +1’750m/-850m | 9h |
| Tue, Aug 19 | Mount Whitney and Mount Muir (from bivouac) | 19km | +1’400m/-2’100m | 10h30 |
| Wed, Aug 20 | Middle Palisade | 20km | +/-2’000m | 14h30 |
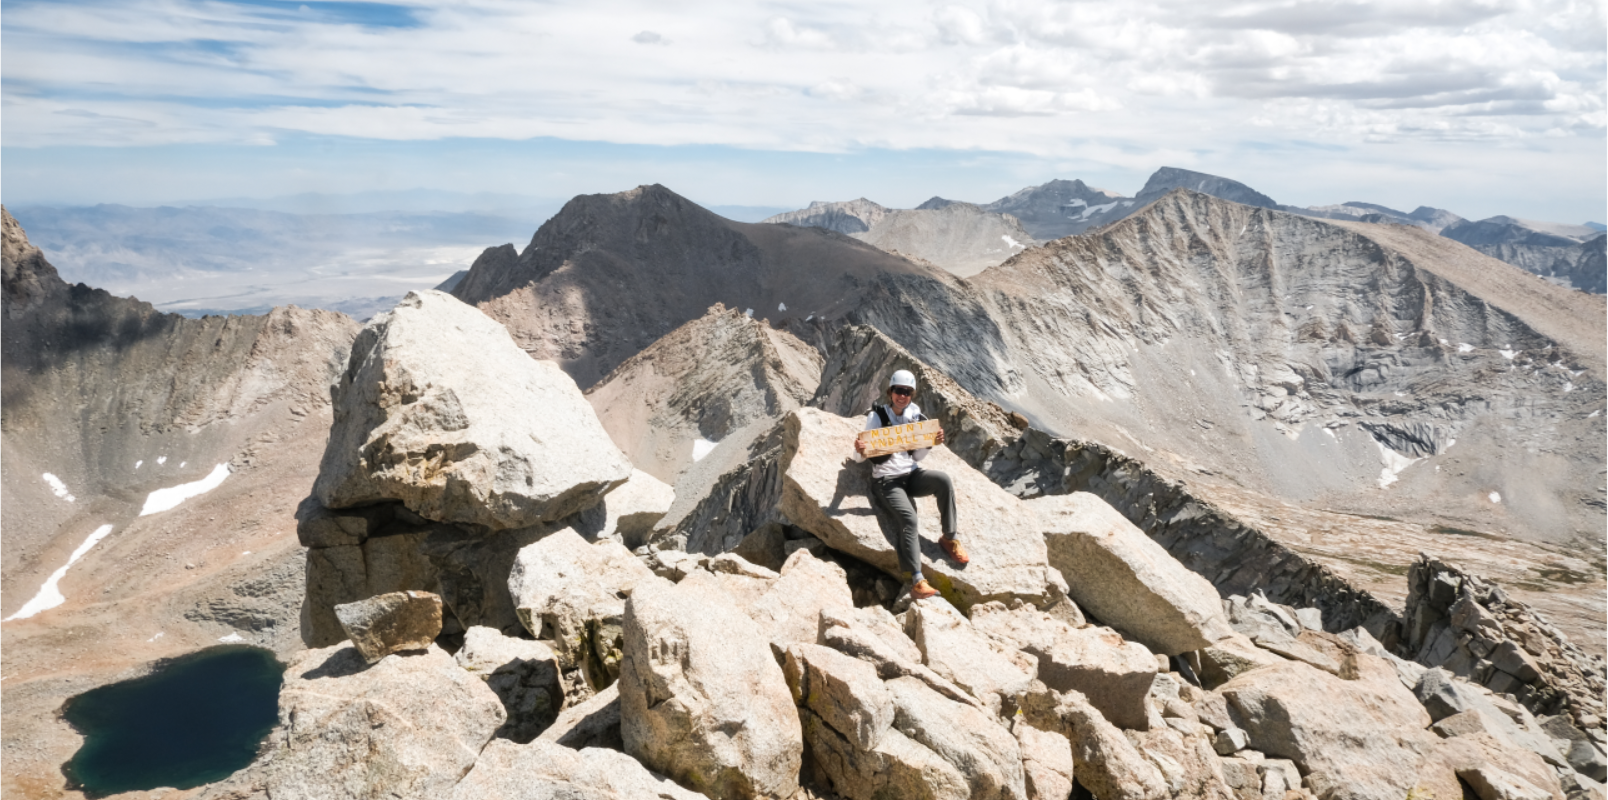
| Thu, Aug 21 | Mount Tyndall (to bivouac) | 22km | +2’700m/-600m | 9h30 |
| Fri, Aug 22 | Mount Williamson (from bivouac) | 28km | +1’500m/-2’900m | 12h |
| Sat, Aug 23 | Drive to Los Angeles and recovery |
Permits
Obtaining the permits was close to a nightmare. For single-day tours, no permit is usually required. The sole exception we were aware of was the Whitney zone, in which are located Mount Whitney, Mount Russell, and Mount Muir. Because we did not plan this project early enough to try our luck in the permit lottery, two weeks before the day we wanted to try to snatch one of the few released permits. After many stressful minutes we were finally able to secure overnight permits for the North Fork of Lone Pine Creek, for Mount Whitney’s mountaineer’s route, Mount Russell, and Mount Muir, and for Shepherd Pass for Mount Tyndall and Williamson. But we had to be really quick and deal with the super buggy reservation system.
Rental car
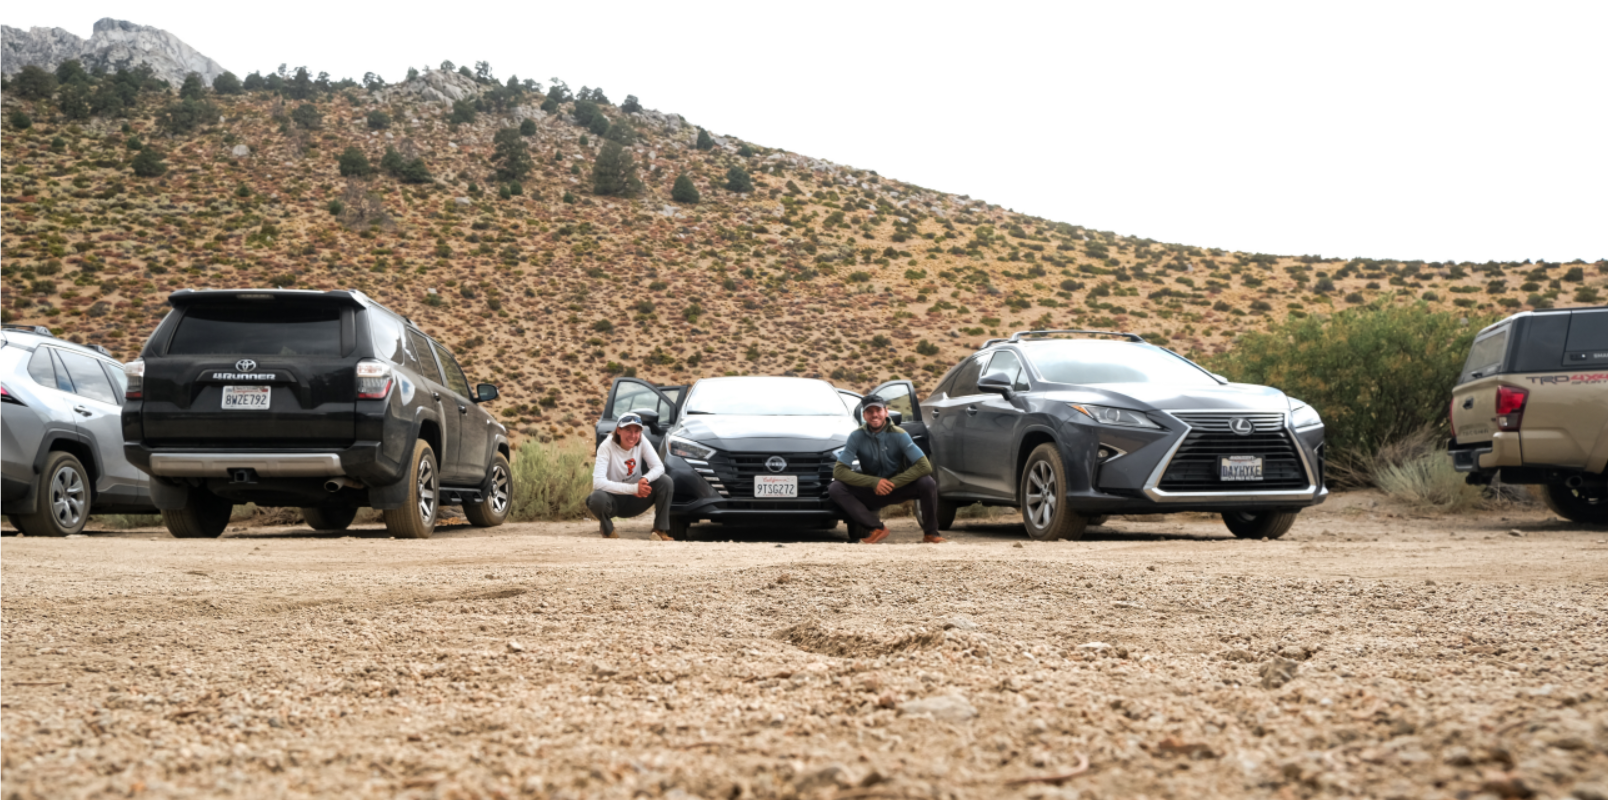
As for the rental car, we went for the cheapest option we could find — a $300 car we rented from Dollar. It served its purpose and brought us everywhere we wanted, but the dirt road up to the Shepherd Pass trailhead pushed its limit. Clearly, we should have opted for a higher clearance vehicle for this, but besides a loud bang without evident consequences, we probably did not inflict any further damage. But our little rental car definitely looked a bit out of place at the parking there.
Research
For each of the hikes, we could find many online reports which cover the full spectrum of quality, ranging from the overconfident, cocky alpine-gangster to the humblest, inspiring mountain-athlete. A site we found particularly useful for checking route descriptions and conditions was PeakBagger. Particularly the newly added feature for superimposing the last 10 GPX tracks on the map turned out to be a game-changer. Not only did it reveal some interesting shortcuts, it also helped inform us how the routes are evolving with changing conditions.
States of Elevation
Incredibly, just two weeks before the starting date of our project, Kilian Jornet—the world’s best mountain endurance athlete—announced that his project called States of Elevation, in which he aims to climb all the 14ers in the mainland US.
In an insane 56-hour-long push, Kilian not only climbed the 7 summits we stood on a month before him in the Sierras, but also bagged Split Mountain on the way and went on to the Palisade traverse in miserable meteorological conditions to set the speed record for the so-called Norman’s 13: a 160km long traverse with almost 12’000m of elevation gain at altitude and in super technical and arduous terrain. All that after having cycled 1’500km from Colorado to California in just 5 days and after almost a month of continuous activity. It is not possible to put the extraordinarity of this performance into words.
The project
The journey started on Saturday morning, August 16, 2025 in Terminal 5 of the LAX airport. I met up with Nathalie to start our long drive to Cottonwood Pass, from where we planned to start the hike to Mount Langley, our first 14er. We stocked up on camping gear, meals, and snacks for the next few days at a Walmart along the way.
We set up camp at the Cottonwood pass walk-in campground and cooked our dinner. An early bedtime was supposed to make waking up at 4am the next day a bit less painful. However, first our noisy tent neighbors and then my upset stomach have put a stop to this plan. Two times I just barely managed to avoid making a huge mess all over the tent, when my body decided that the huge portion of just partially cooked mushrooms we put in the pasta sauce for our dinner should be expelled. Besides a light headache from the rapid change in altitude the previous day, I got up excited about our first hike.
Mount Langley
At 4:30am, still in the dark, we set out for an easy hike to Mount Langley. It would be the longest but by far the least technical of all the hikes; perfect for acclimatization. By pure chance, we crossed two guys who told us that they carried up a sign to the summit of Mount Langley the previous day. We could find such wooden signs with the name of the mountain as well as its altitude engraved on almost all the summits, but it seems like the one on Mount Langley must have either been stolen, broken, or in need of a replacement in another way.
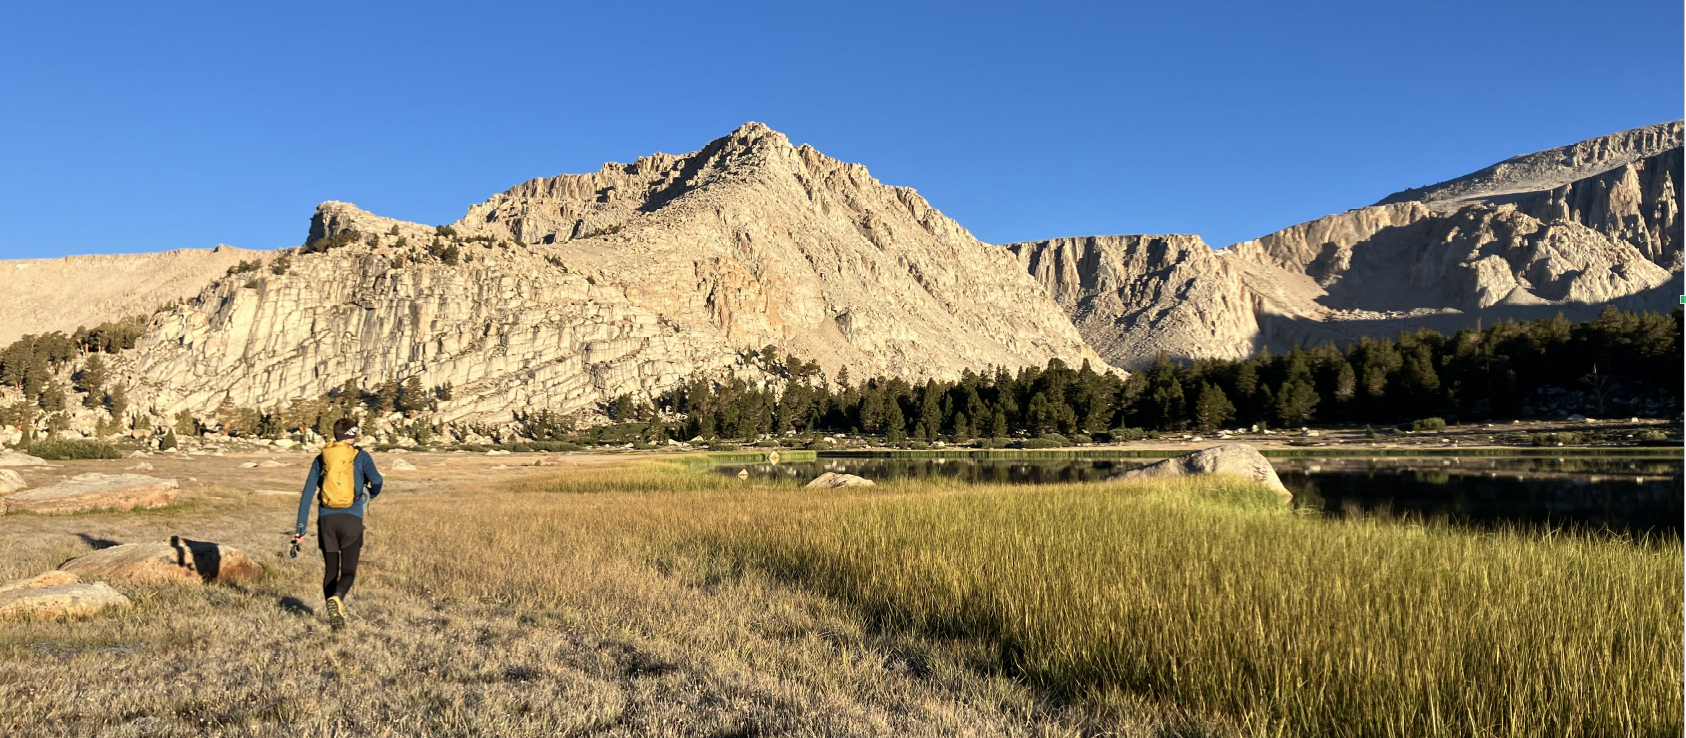
By the time we reached the first campsites, we started catching up with some other groups, of which we would see many more until the summit; many of them using Mount Langley to fulfil their dream of reaching 14’000ft by foot. The hike up was very enjoyable and scenic with multiple lakes and forests along the way.
Without much difficulty we made our way to the summit and back down again on a slightly different route than on the way up.
38km | 1’500m+ | 11h GPX Strava
| Endurance | ★★★★☆ | Exposure | ★☆☆☆☆ |
| Technique | ★☆☆☆☆ | Route-finding | ★☆☆☆☆ |
| Encounters | ~40 people | Global difficulty | T2 |
We spent one more night at 3’000m/10’000ft at the Cottonwood Pass campground and started the next day early with a short drive over to the Whitney Portal.
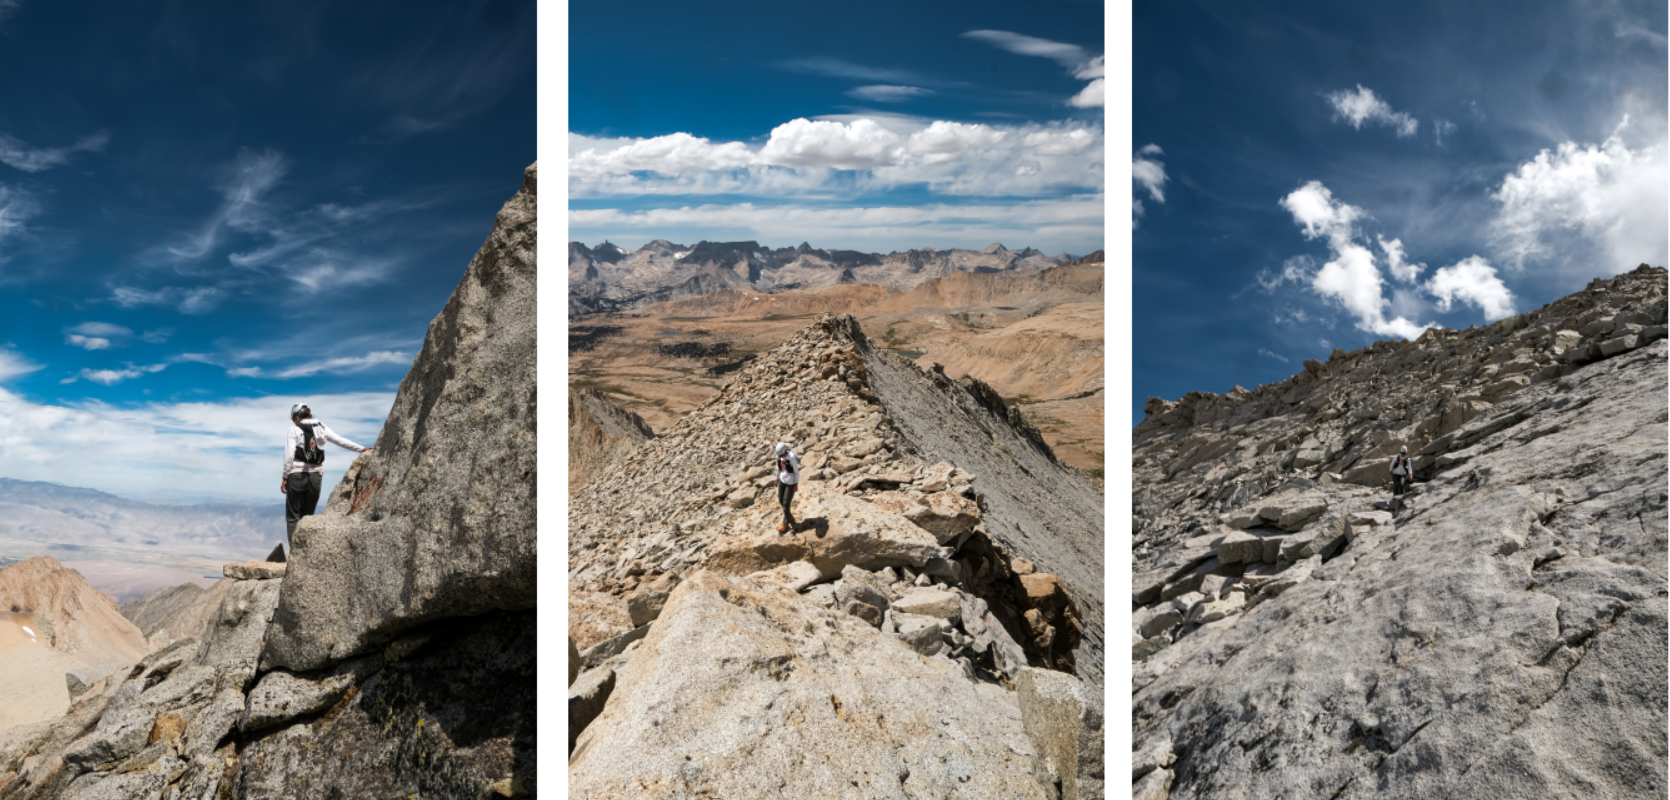
Mount Russell - East ridge
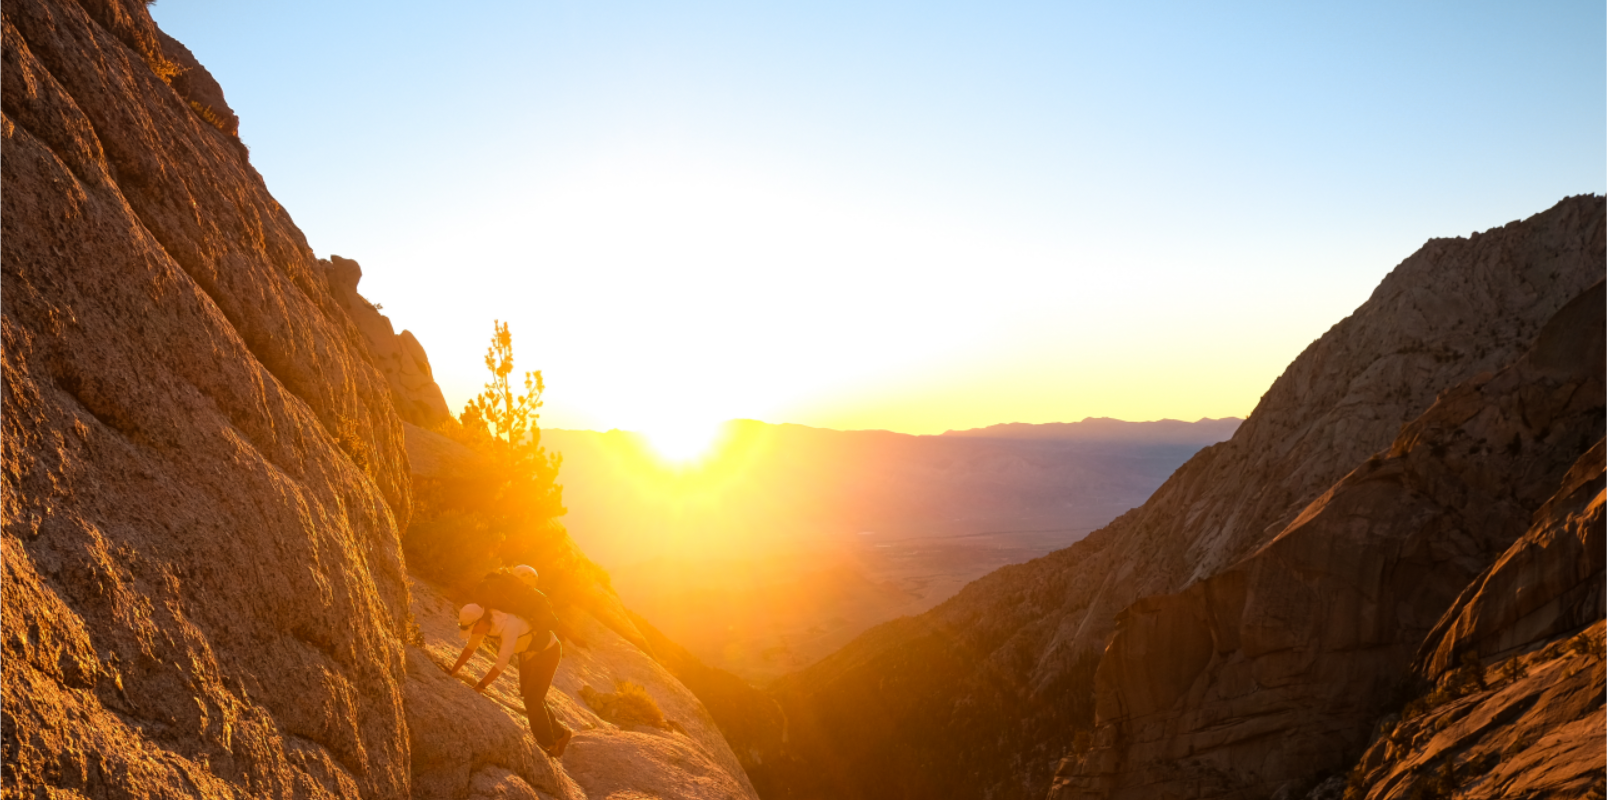
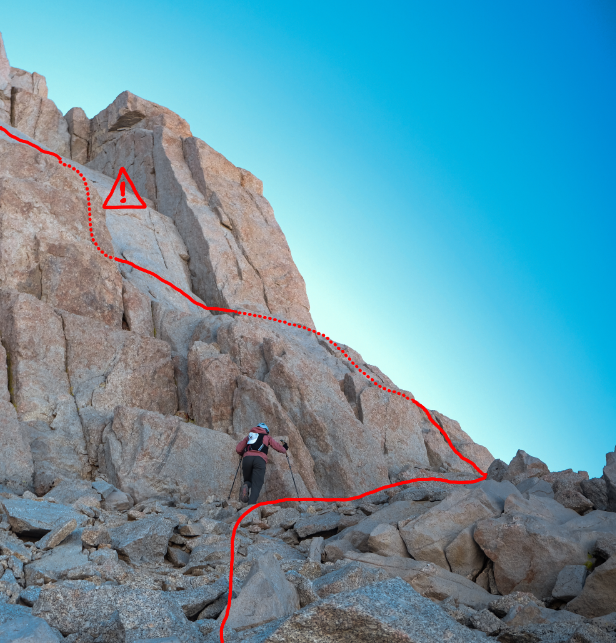
With our heavy backpacks filled with enough gear for two days of bivouacking, we started following the North Fork of the Lone Pine creek at 5:30am to reach our camping spot at Upper Boyscout Lake as early as possible. The sunrise caught is right when we were scrambling up the Ebersbacher ledges.
This section is notoriously hard in terms of navigation and also very exposed, but technically relatively simple.
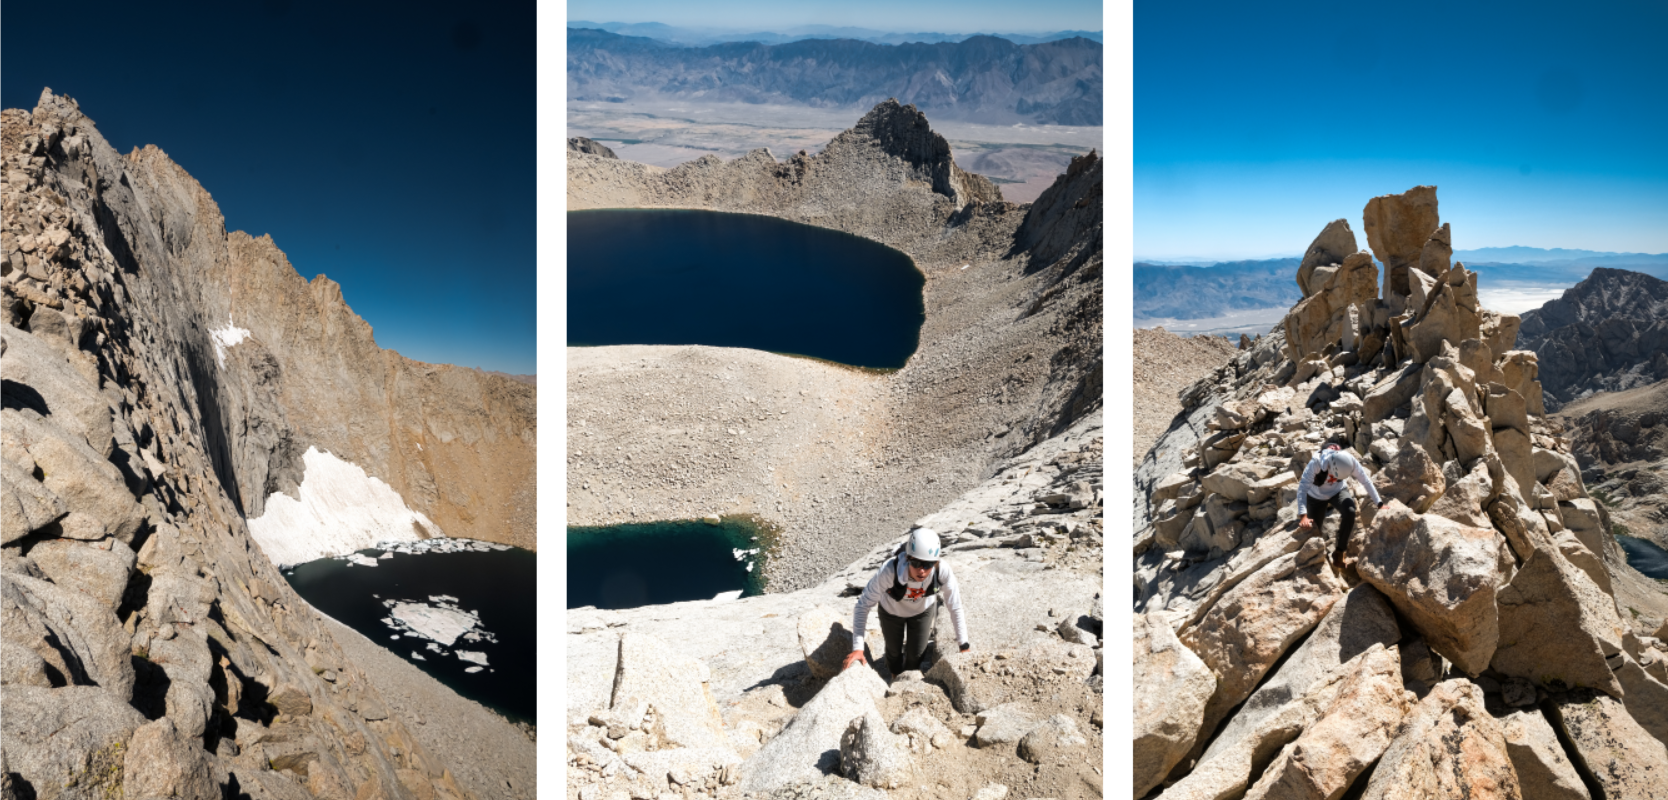
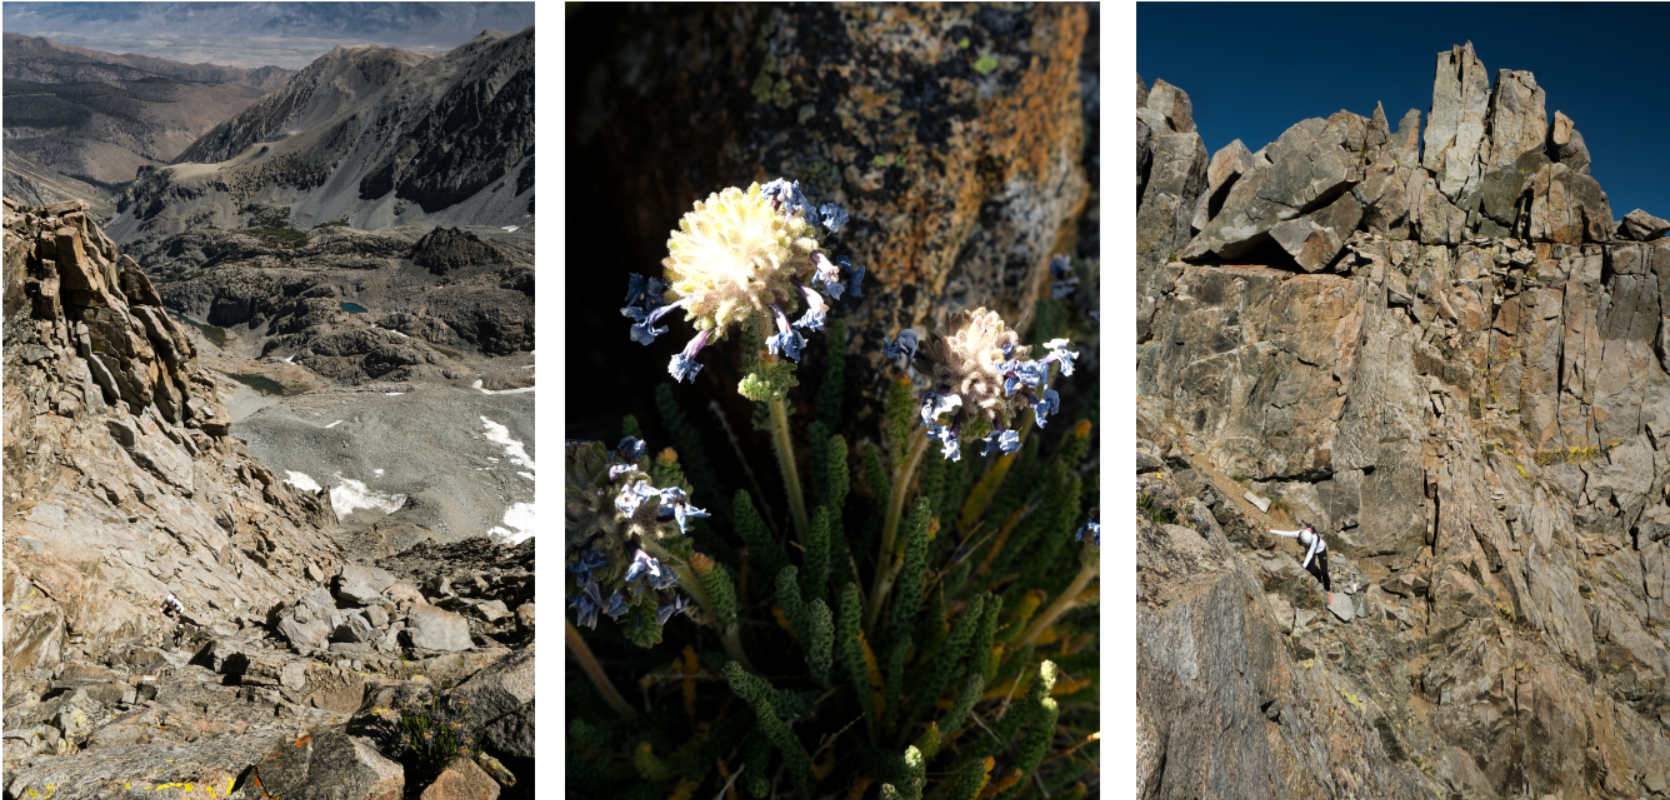
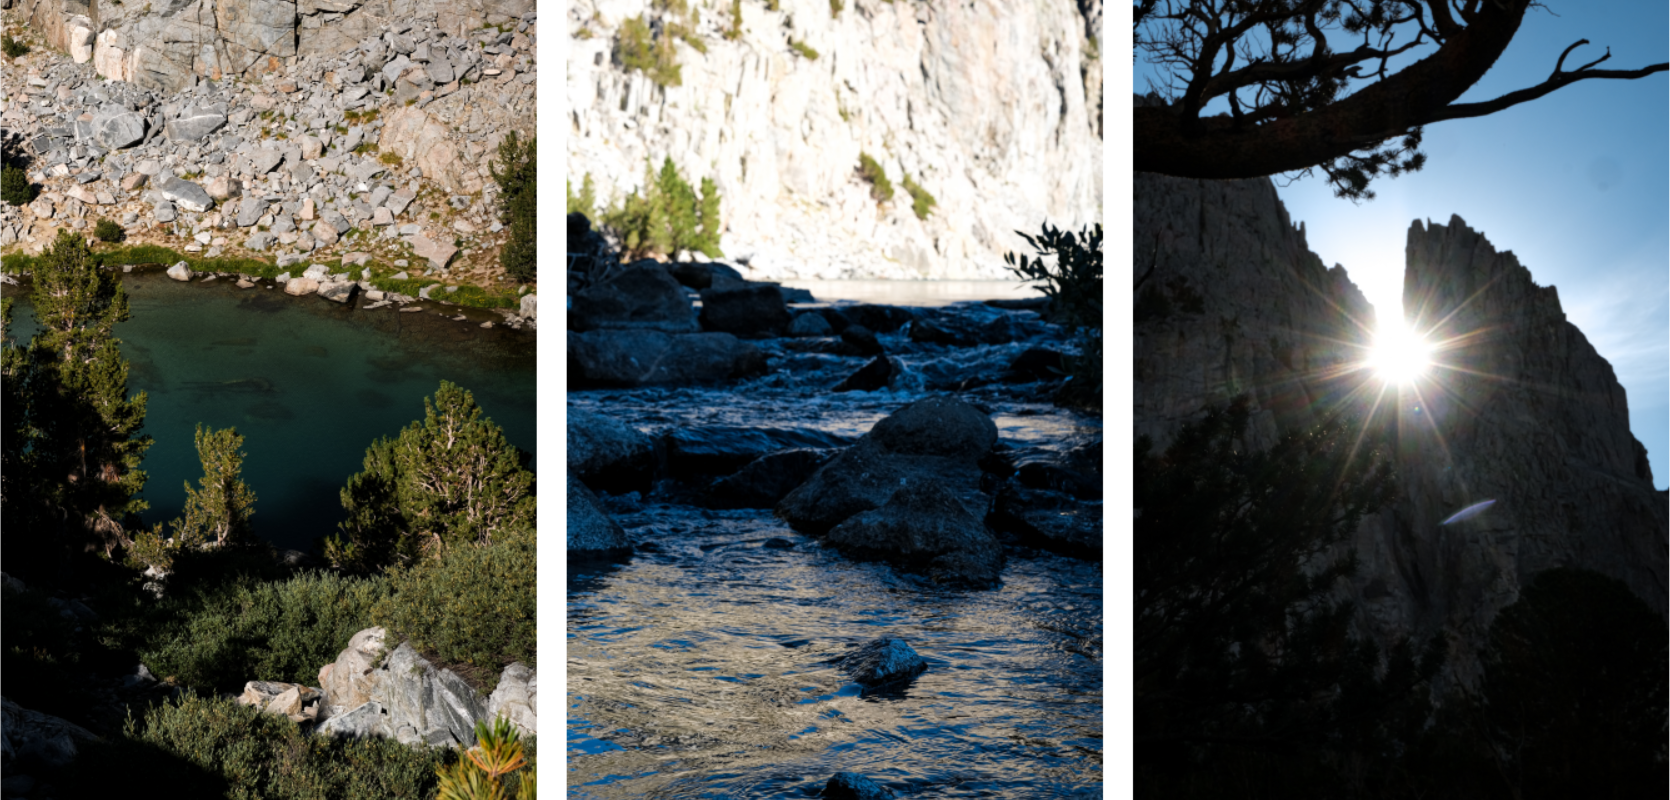
Trusting our instincts, we soon turned our backs to the sun and continued following the lushly overgrown valley floor. Soon after we reached Upper Boyscout Lake. After quickly setting up camp and pulling up our food to a tree to avoid wild animals eating it before us, we set out to climb Mount Russel. The first part of this hike was no fun: It involved going up a steep slope full of scree and sand, sometimes just able to progress up the slope thanks to the additional traction of the trekking poles. After a tough battle, we were happy to reach Mount Russel’s east ridge. The rock was of outstanding quality, offering us a world-class scrambling experience with a stunning view on two beautiful dark blue lakes.
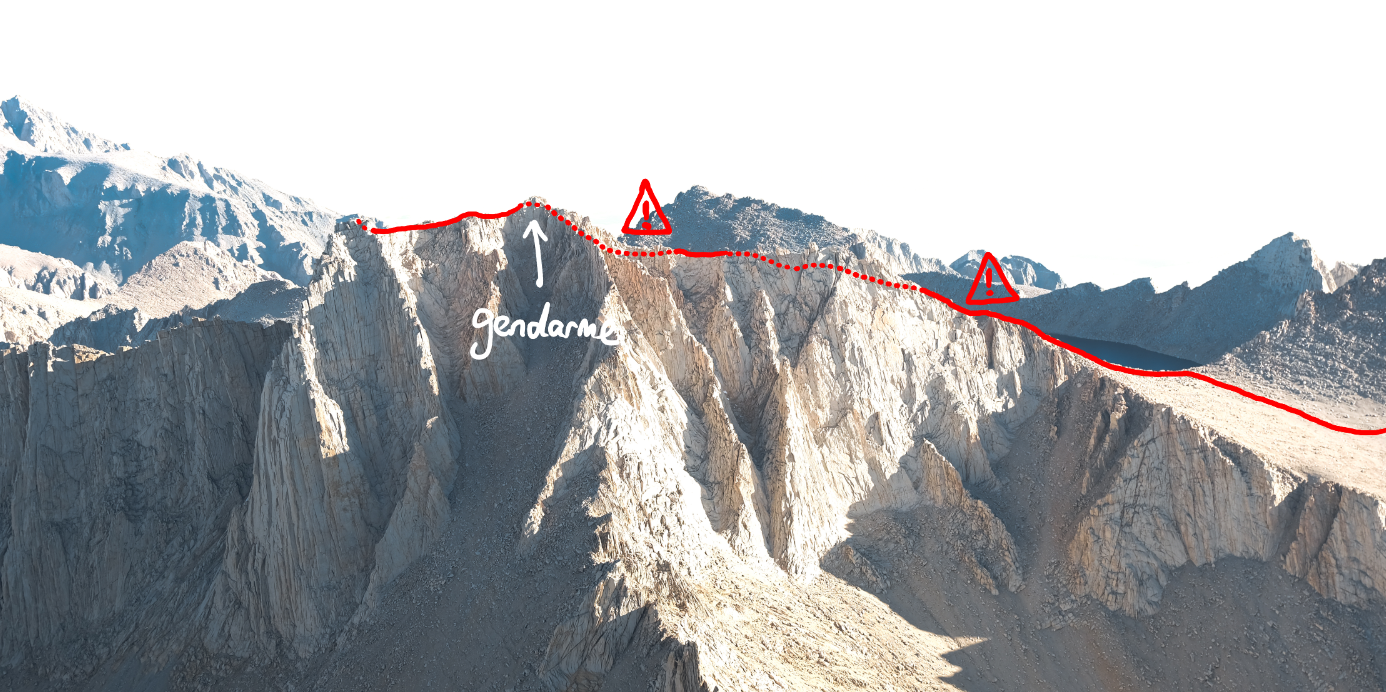
Half-way up the ridge, we saw a backpack lying on a small plateau. Not having crossed anyone on the way up yet, we were relieved that we would not be alone on the route. On a very exposed section shortly before the gendarme, Nathalie decided not to do a move she was not 100% comfortable with, so we agreed that I would quickly go to the summit alone. In an effort to be back as fast as possible, I slowly entered a flow-state and could climb the steep gully to the gendarme with very high precision and speed. The summit ridge was mostly runnable and my excitement grew because I was looking forward to meeting the owner of the backpack right at the summit.
However, when I climbed the last section before the summit, my heart sunk: Not a single soul was in sight. I quickly grabbed the summit book and checked for the latest entry: “9/18. Almost turned around a few times, glad to make it. Dan, Fallbrook”. September 19? He must have mixed up the month. But that is impossible. To my eye there was only a single logical and intuitive route along the ridge to the summit, so if we saw his backpack earlier on, we would have surely crossed each other. I tried to call Nathalie to report on this incident, but could not reach her. This worried me a bit, because Nathalie would be surprised if the guy did not encounter me on the way up. I hesitated to call 911 on the spot because I might not have any cell signal further down, but stayed calm and tried to go back as fast as I could, periodically shouting “hello” or “are you there” and checking left and right of the ridge for any sign of life. “Thank god!” was my reaction to seeing a middle-aged man in a white tank top climb down far below the gendarme. I quickly caught up with him and helped him find the correct route on the tricky traverse right after the gendarme after he told me he was not really at ease with the exposure. After a while, I felt he no longer needed my help and parted ways with him to quickly rejoin Nathalie.
Without any difficulties we got back to the scree slope and started scree-surfing down it. Back at the campsite, our shoes were filled with sand and small stones. The refreshing bath in the freezing cold Upper Boyscout Lake was a blessing.
12km | 1’750m+ | 9h GPX Strava
| Endurance | ★★★☆☆ | Exposure | ★★★★★ |
| Technique | ★★★★☆ | Route-finding | ★★★☆☆ |
| Encounters | 1 person | Global difficulty | T5 |
We spent the evening eating some MREs and went to sleep relatively early.
Mount Whitney - Mountaineer’s route
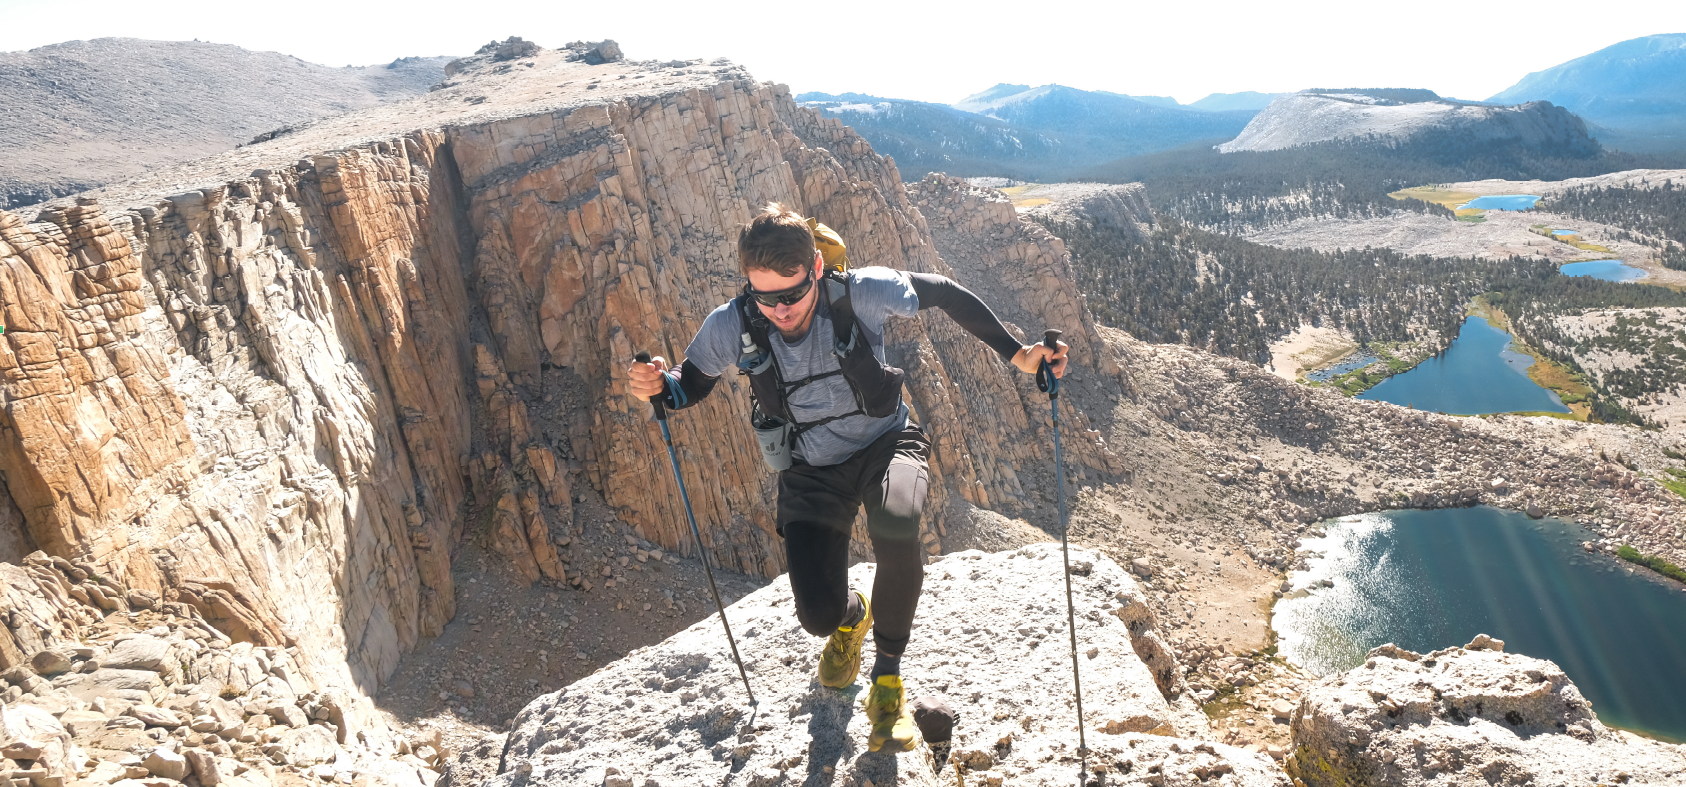
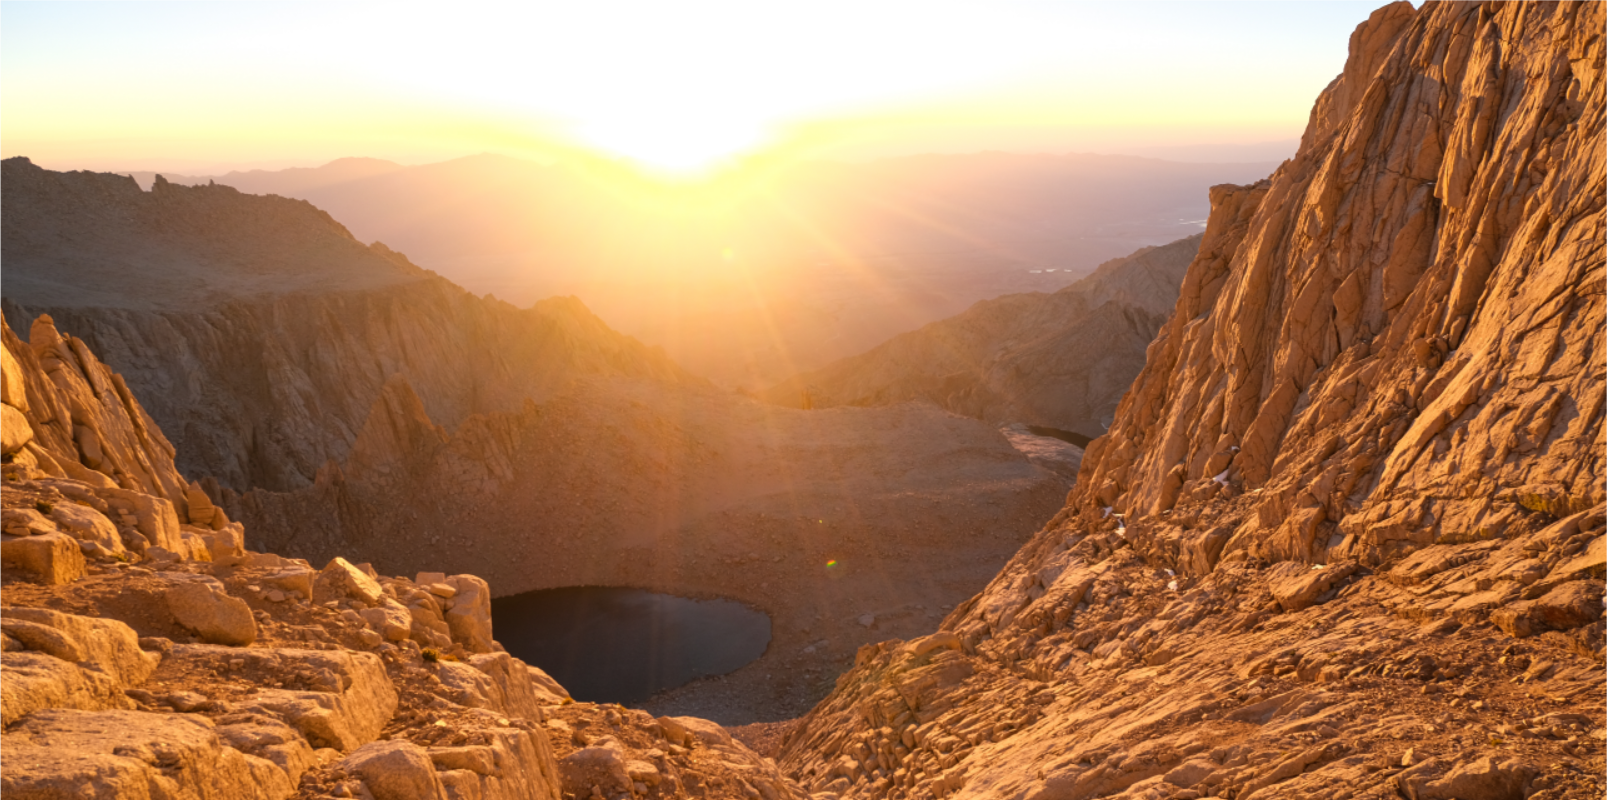
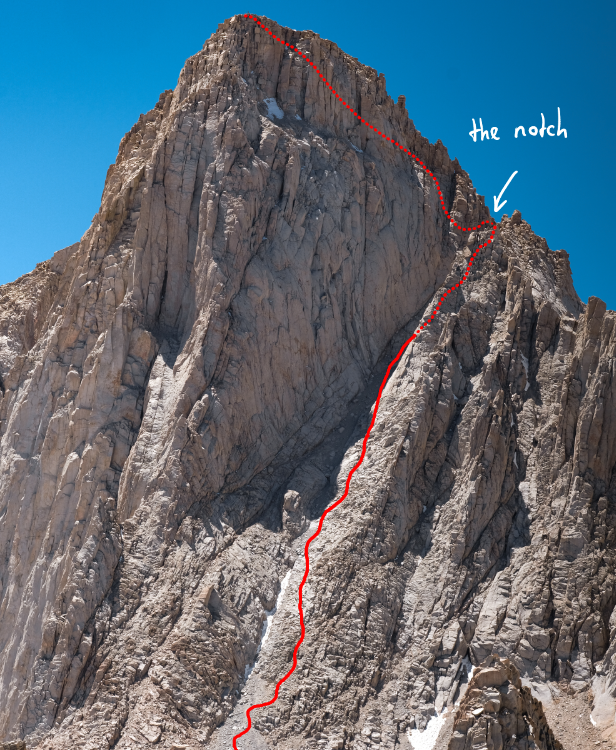
We woke up to a beautiful starry sky. At 4am we started walking into the complete darkness. When the first light of the day reached us, we were already at Iceberg Lake and started to climb up the long and steep chute of Mount Whitney’s mountaineer’s route. Once again, we could enjoy some gorgeous “sunrise scrambling”.
The sunrise scrambles were one of my favorite part of the trip. In general, sunrises in the Sierra Nevada are marvelous: the dry air and the distant mountain chains above which the sun rose made for uniquely colorful and vibrant sunrises. Chasing your shadow up the mountain right in front of you was like a childish game.
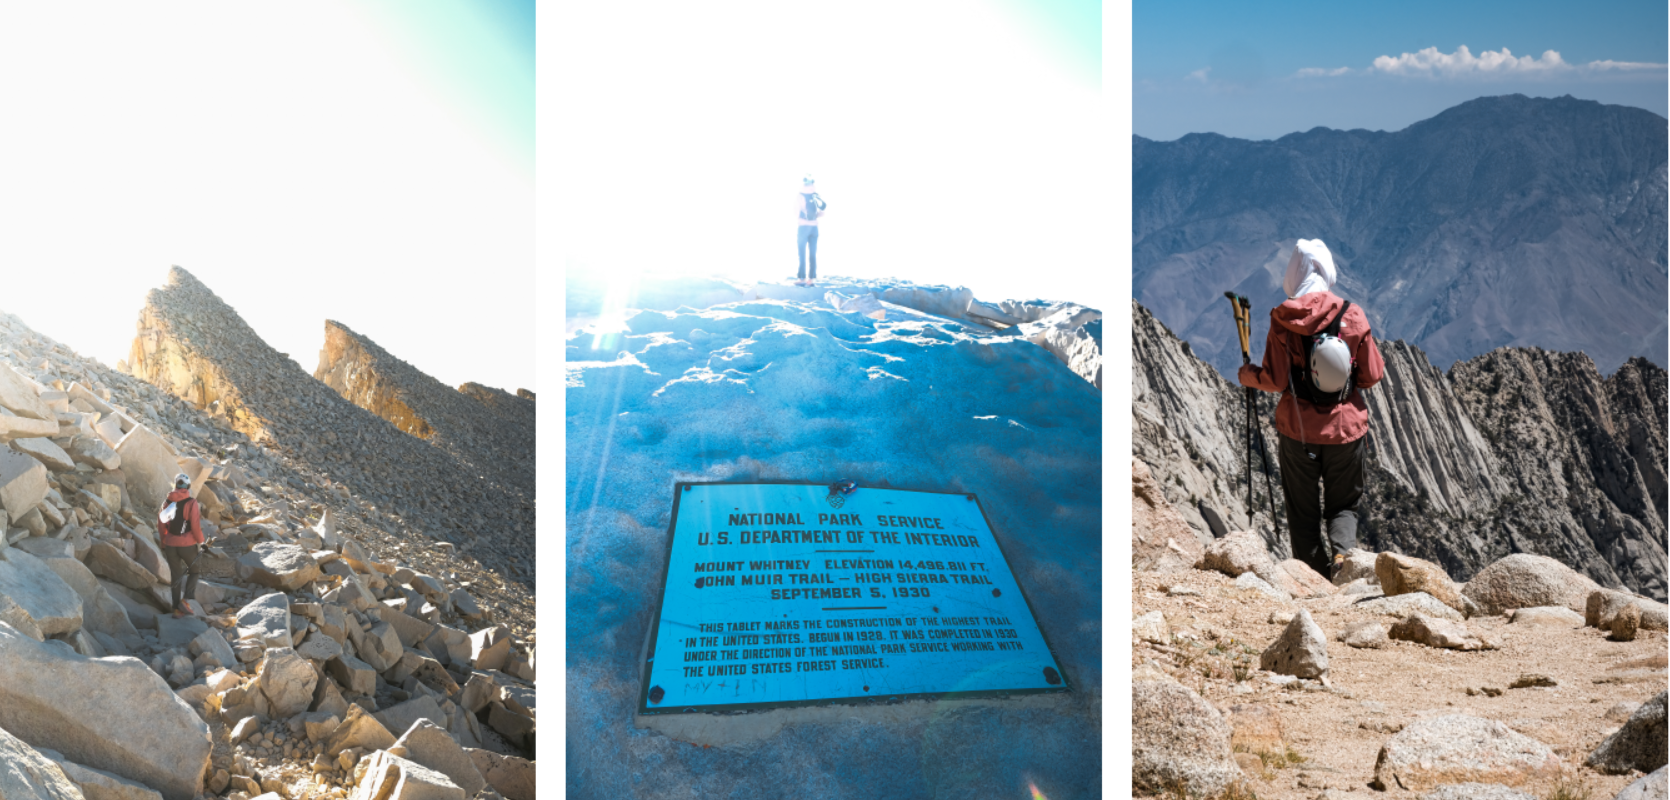
Soon, we made our way up to “the notch”, which marked the exit point of the chute. We horizontally traversed a steep scree field to reach the summit plateau, at the end of which we reached the highest point of the mainland USA.
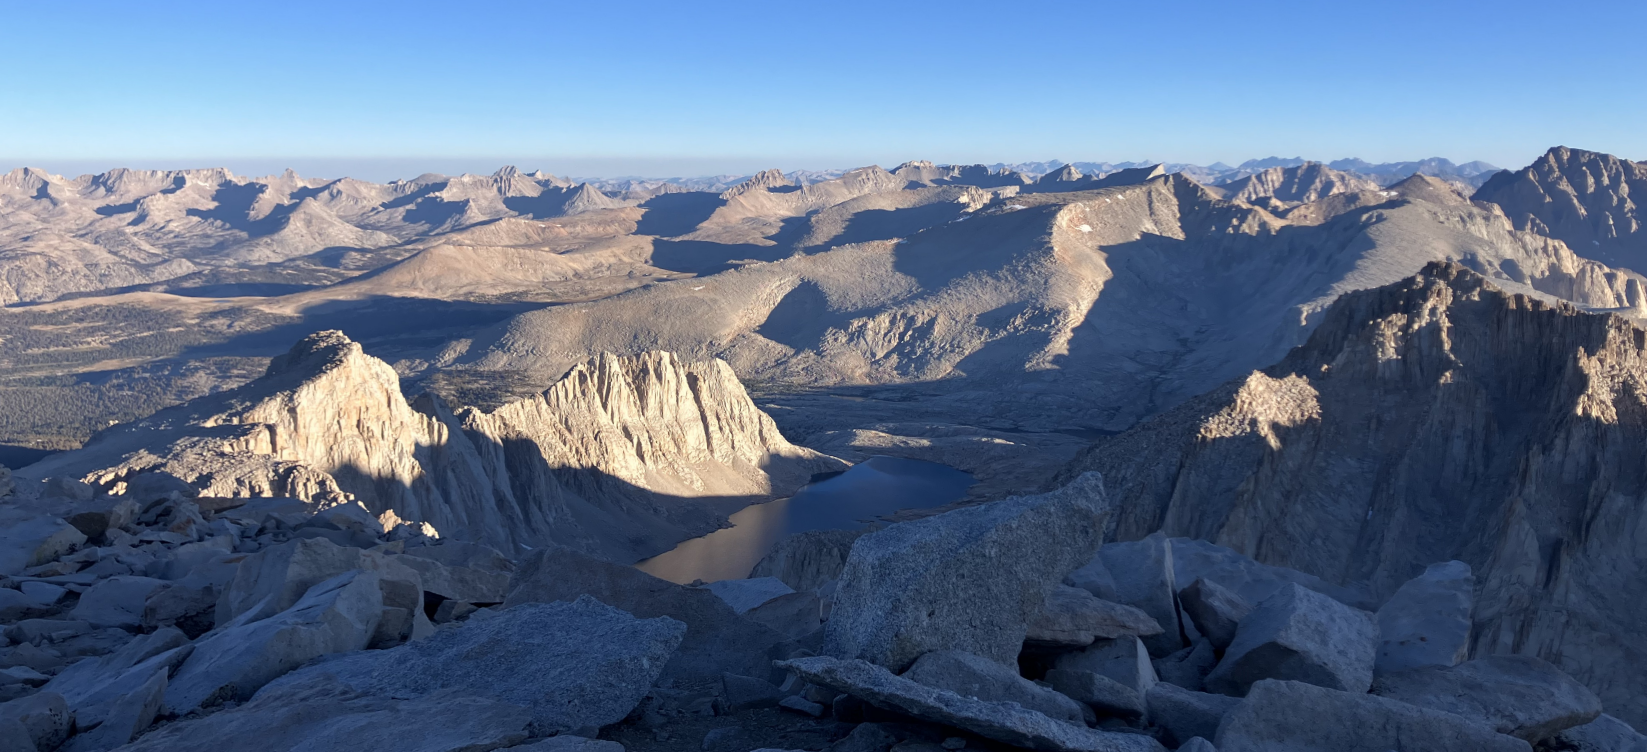
Interestingly enough, there is a hut located at the summit. However, it is barely large enough to fit a accommodate a handful of people.
19km | 1’400m+ | 10h30 GPX Strava
| Endurance | ★★★☆☆ | Exposure | ★★☆☆☆ |
| Technique | ★★★☆☆ | Route-finding | ★★☆☆☆ |
| Encounters | 2 people (on Mountaineer’s route) | Global difficulty | T4 |
Mount Muir
Usually gone completely unnoticed, Mount Muir can be reached by going down the Whitney trail for a few kilometers. While our permits technically did not allow us to take the Whitney trail, it would have been a shame not to quickly bag this summit. We were happy that on the way down, instead of park rangers, we just encountered a dozen and more hikers at the end of their forces, wondering why we might have brought helmets with us for strolling along the Whitney trail. From the Whitney trail, a slope filled with lots of loose big rocks lead us to the foot of Mount Muir. While the summit wall was relatively short, it was definitely the most technically demanding of the seven 14ers we climbed. Upon careful inspection of the routes we found online, we started climbing, and immediately found ourselves doing moves which involved smearing our feet against the polished rock for stability, comparable to easy boulders in a climbing gym. The quality of the rock was outstanding and brought joy to our hearts with every time we touched it. The moderate exposure helped us confidently climb the three short pitches to reach the summit block. An extremely awkward and sketchy move involving a slow weight transfer with one foot way higher than the other gave us access to the summit.
The freezing cold wind invited us to not stay on the summit for too long. Climbing down Mount Muir was quite challenging, but reversing the moves we took while going up helped us get down safely. We quickly caught up with the hikers we crossed moments before on Mount Whitney, now even more confused than before, but this time why we would go up Mount Whitney a second time, but parted ways with them to go head back down the mountaineer’s route.
| Endurance | ★★☆☆☆ | Exposure | ★★★★☆ |
| Technique | ★★★★★ | Route-finding | ★★★☆☆ |
| Encounters | None | Global difficulty | T5/3c |
Arrived at the camp, we packed together our stuff and headed back down to our car. After a strenuous ride along a dirt road, we reached Independence where we wanted to camp at a campsite. Unimpressed by the empty and desolate campsite, we decided to instead directly go to Big Pine and book a night in a Motel. This would be nice for us to recover optimally from the long days behind us and allowed me to quickly submit the revision of a paper.
Middle Palisade
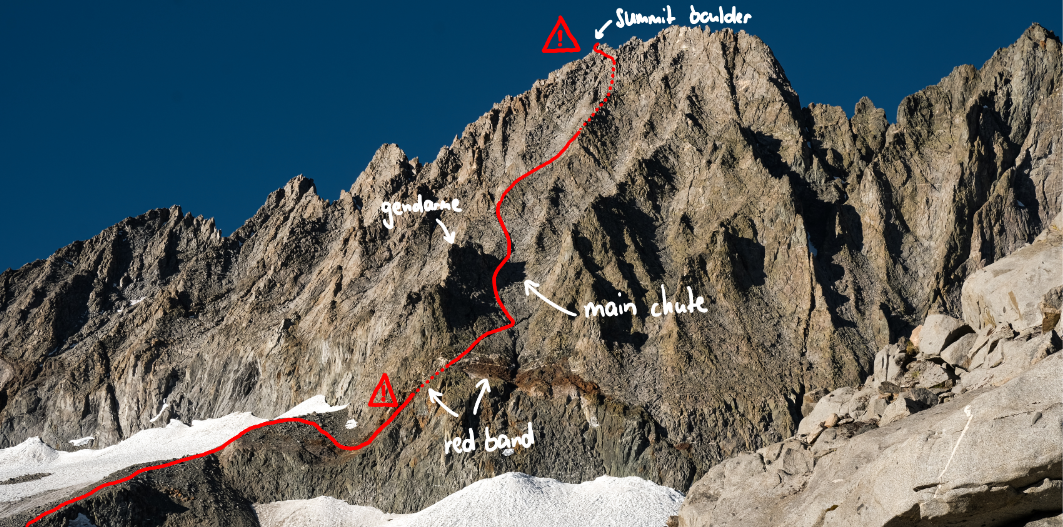
Early as usual, we drove up to the Big Pine Creek trailhead and started our long day with the goal to climb Middle Palisade. In many ways, Middle Palisade was the most extreme climb we did: Its north-east face is an outrageously steep 300m/1000ft tall wall. I would lie if I was not intimidated by the first sight of it.
The approach was long and strenuous, and a large part of it was off-trail. Unlike some of the GPX tracks we found online, we decided to traverse over to the moraine just below what is left of the glacier. The rock there looked much firmer, and this choice saved us from struggling up the moraine for even longer. We reached the red rock-band guiding the way to the entrance of the main-chute, and started climbing.
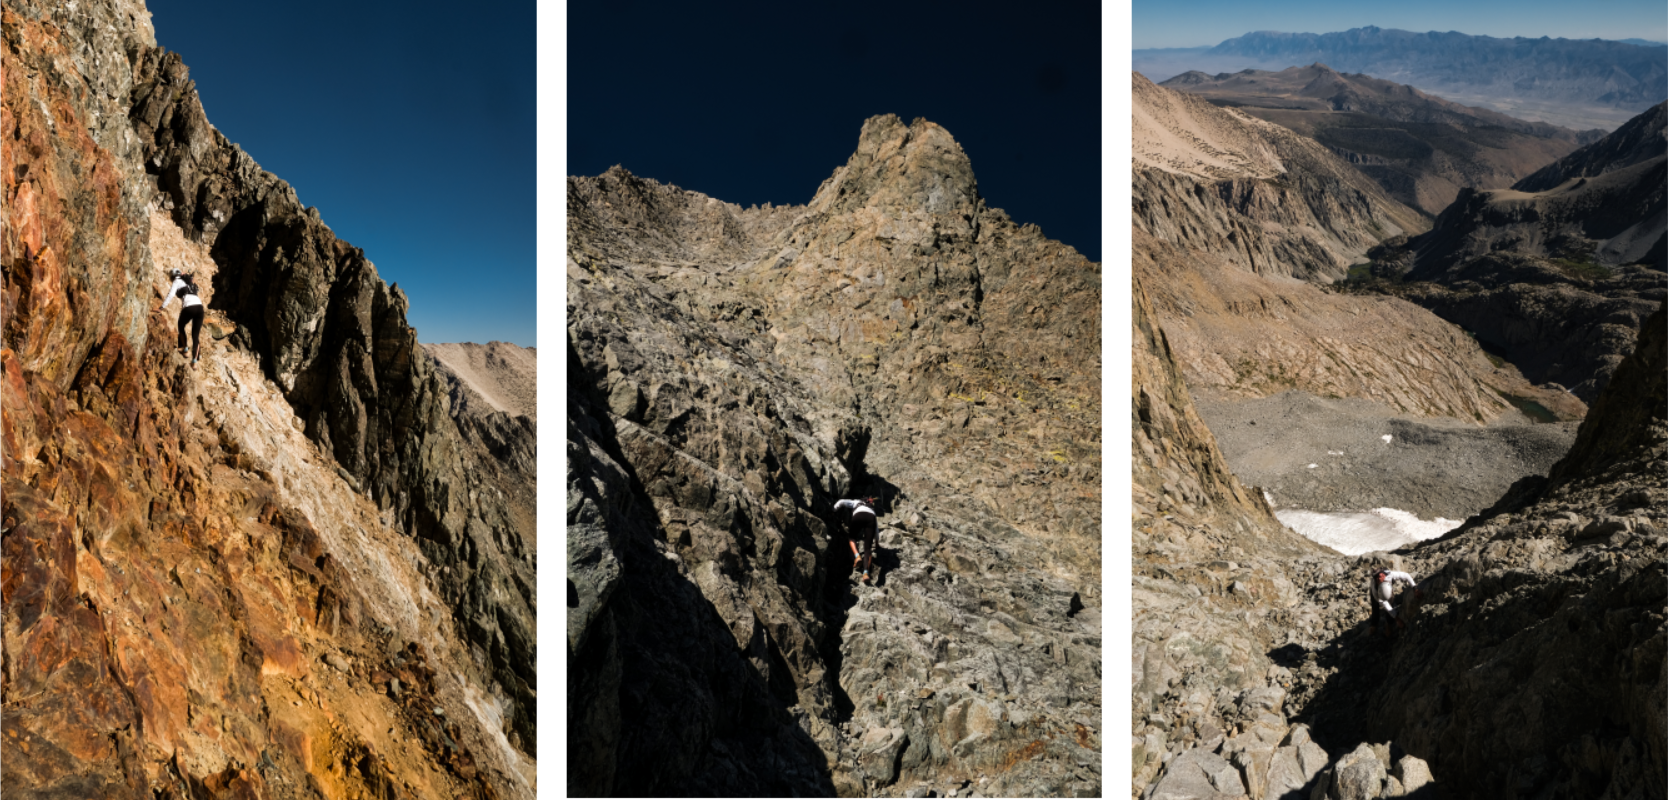
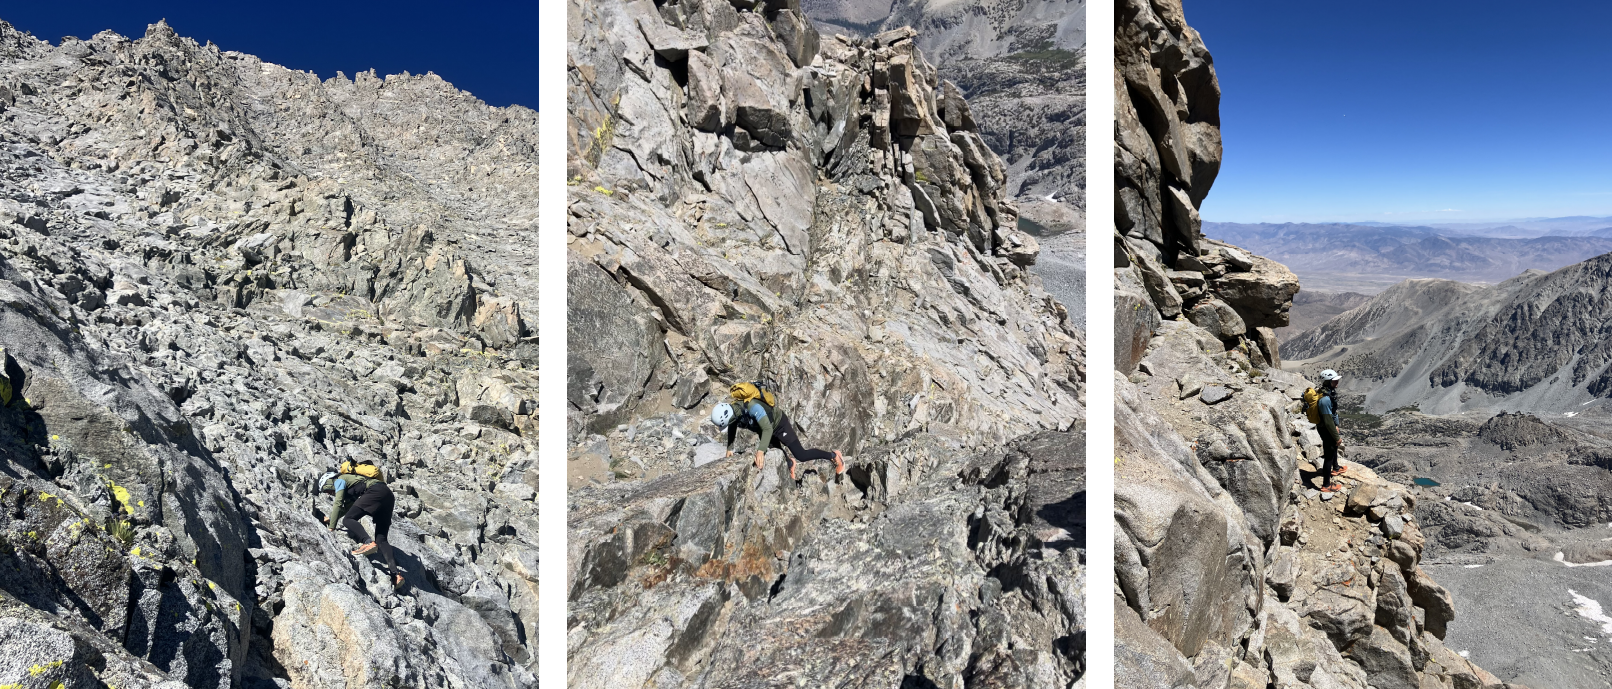
Climbing up the red rock band is initially quite exposed and one cannot trust any of the rocks. Soon after, though, the climbing started getting easier, but the permanent exposure made the climb a true mental challenge. Luckily, the rock was quite solid, and we could follow some intuitive cracks and gullies which offered some protection. We always had to be extremely careful with rock fall. While the rock in the Sierras is so stable that natural rockfall is extremely rare, climbing below your partner is almost guaranteed to lead to serious problems with falling rocks. Hence, we often had to climb one-by-one, which slowed us down significantly.
After not having seen a single human being all day long, our surprise was great when we saw a colorful spot move far above us in the wall. Little later, we found ourselves having a short conversation with this roughly 30-year-old man with long hair and overall a very casual behavior. Upon asking him for some advice on route-finding further up in the wall, he responded with: “Just enjoy this beautiful Sierra third class rock, WHOOP!”.
In moments when I forgot about the exposure, I felt almost like in mountain-paradise. Throughout the whole wall, we could see flowers sprouting on ledges and between cracks in the rock. The temperatures were very pleasant, and it was completely wind still.
The climbing was in general quite easy, and the route-finding very intuitive. Small gullies and platforms helped reduce the exposure and naturally subdivided the wall into roughly 20 sections. While at the entrance of the wall we had to test every hold before we used it, the further up we got, the firmer the rock became.
A short sequence of climbing moves got us onto the ridge and offered an incredible view in all directions.

With utmost care we went down the same way we came up, and after having spent almost 8 hours in the wall, were happy to reach the more friendly lakes and rivers guiding our way back down to the car which we reached shortly before nightfall. Theoretically, if everything had worked perfectly well, the most ambitious plan would have been to also bag Mount Sill immediately after Middle Palisade. However, the rough terrain to get there and mental fatigue from the long exposure luckily disallowed such an undertaking.
20km | 2’000m+ | 14h30 GPX Strava
| Endurance | ★★★★☆ | Exposure | ★★★☆☆ |
| Technique | ★★★★★ | Route-finding | ★★★★☆ |
| Encounters | 1 person | Global difficulty | T5/3a |
After the long hike down, we came back quite late. We quickly set up our tent and prepared dinner at the campground. The first few nights, I was not really able to sleep too well. In fact, I was awake most of the nights until early in the morning, when I usually fell asleep for 1-2 hours until the alarm rang. By pure coincidence, Nathalie and I started talking about the ingredients of the electrolyte tablets I have religiously been taking every evening to ensure an optimal recovery. Hilariously, only at that point did I recognize that each tablet contained 150mg of caffeine, i.e., two espressos worth of caffeine. Since I only rarely drink coffee, I now finally got to the bottom of my sleep issues.
Another almost sleepless night later, we attacked the drive over to the Shepherd Pass trailhead. However, what started on the highway, quickly turned into a dirt road, and ended in what I would refer to as off-road driving. The clearance of our cheap rental car was clearly not sufficient for this road, and we had pray for our car not to get demolished or even tip over. Somehow, we made it there, and parked in between the pick-up trucks already standing there. What a funny sight!
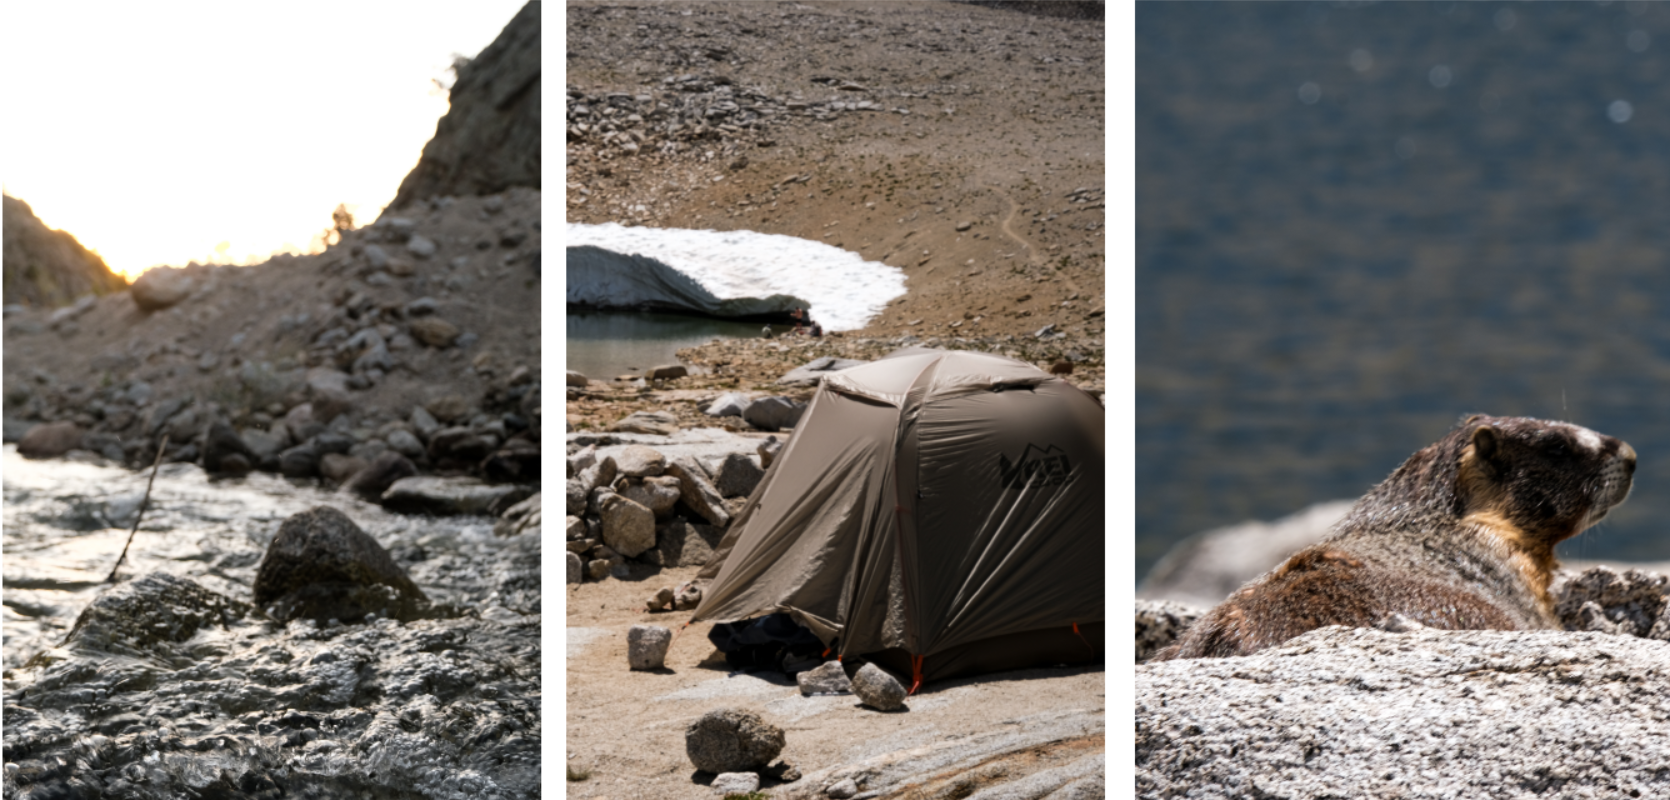
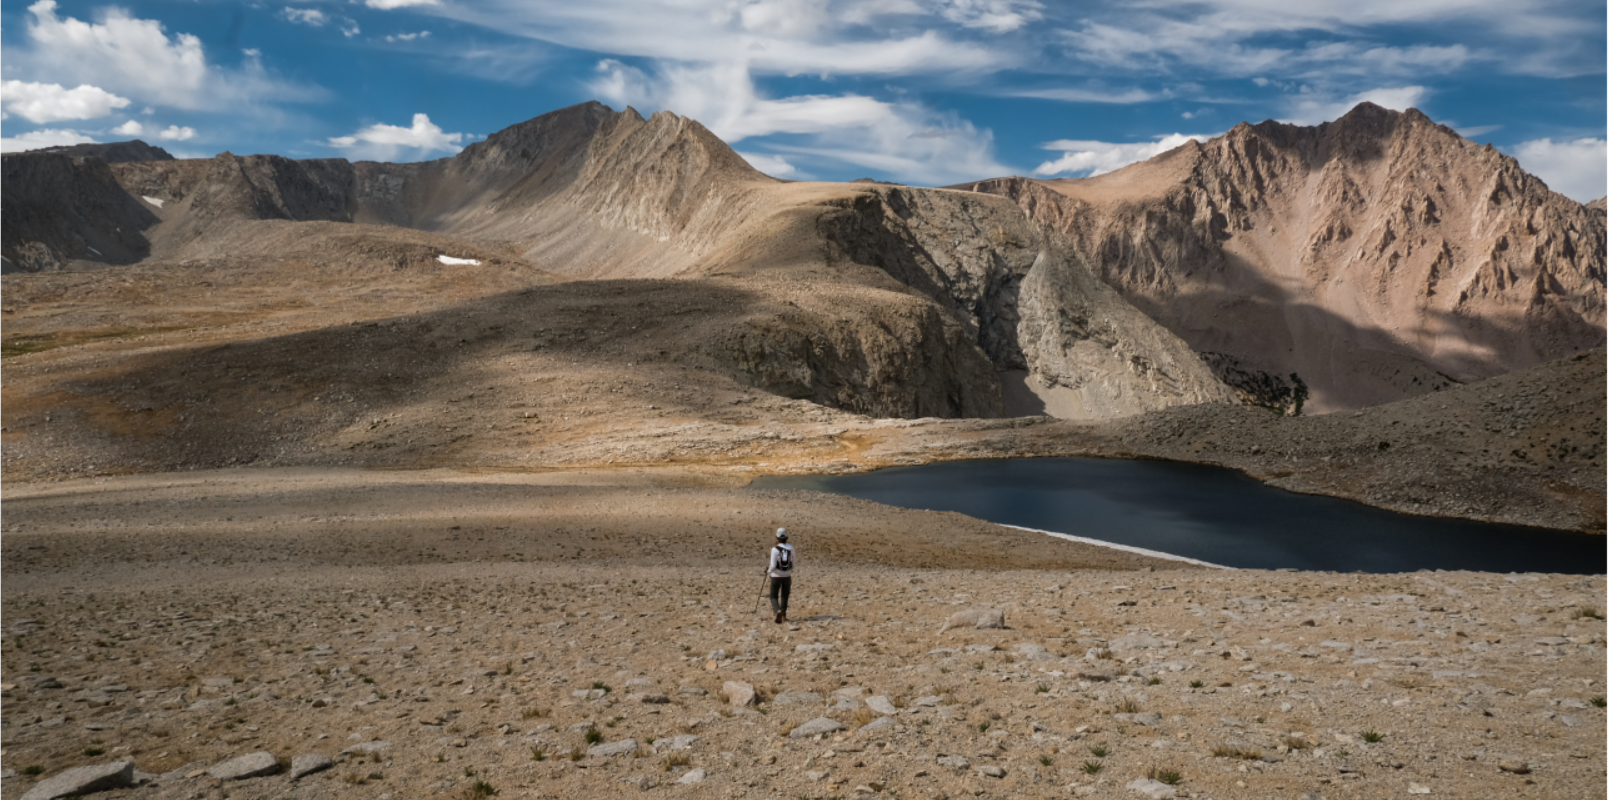
The hike up to Shepherd pass was long, but the path was almost more even than the road to the trailhead, so we made fast progress with our heavy backpacks. We pitched our tent next to the lake and immediately set out to bag Mount Tyndall.
Mount Tyndall
Mount Tyndall was by far the simplest of the seven summits we did. From the campsite, it was just a roughly four-hour-long hike away. The route basically follows up a rib all the way to the summit ridge. The climbing is easy, but the slope is just steep enough to permanently make one uneasy about the exposure. For the first time this week, clouds started covering the skies.
We were aware that a thunderstorm was forecast to hit the Sierras, but only the next day around noon, so we enjoyed observing the playful contrast these white blobs brought to the skies. Half-way up, we crossed a guy who was descending our route. We chatted for a bit with him, and he insisted that we should be careful because of the clouds. It made us uneasy for a while, but having seen the forecast, we kept going scrambling up the slab.
The summit ridge was gently sloped and offered some beautiful views in all directions.
As the clouds started covering larger and larger portions of the sky, we headed down quickly and without any problems. We arrived back at our campsite at the lake around 3pm. Early enough to prepare everything for our last expedition and get enough sleep, because the next day, we would need to wake up only shortly after midnight.
22km | 2’700m+ | 9h30 GPX Strava
| Endurance | ★★★☆☆ | Exposure | ★★☆☆☆ |
| Technique | ★★☆☆☆ | Route-finding | ★★☆☆☆ |
| Encounters | 1 person | Global difficulty | T4 |

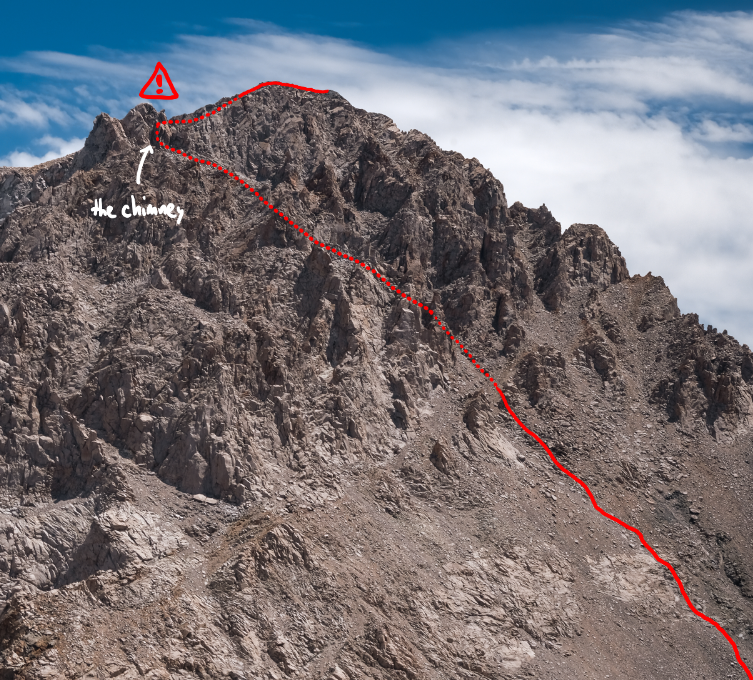
Mount Williamson
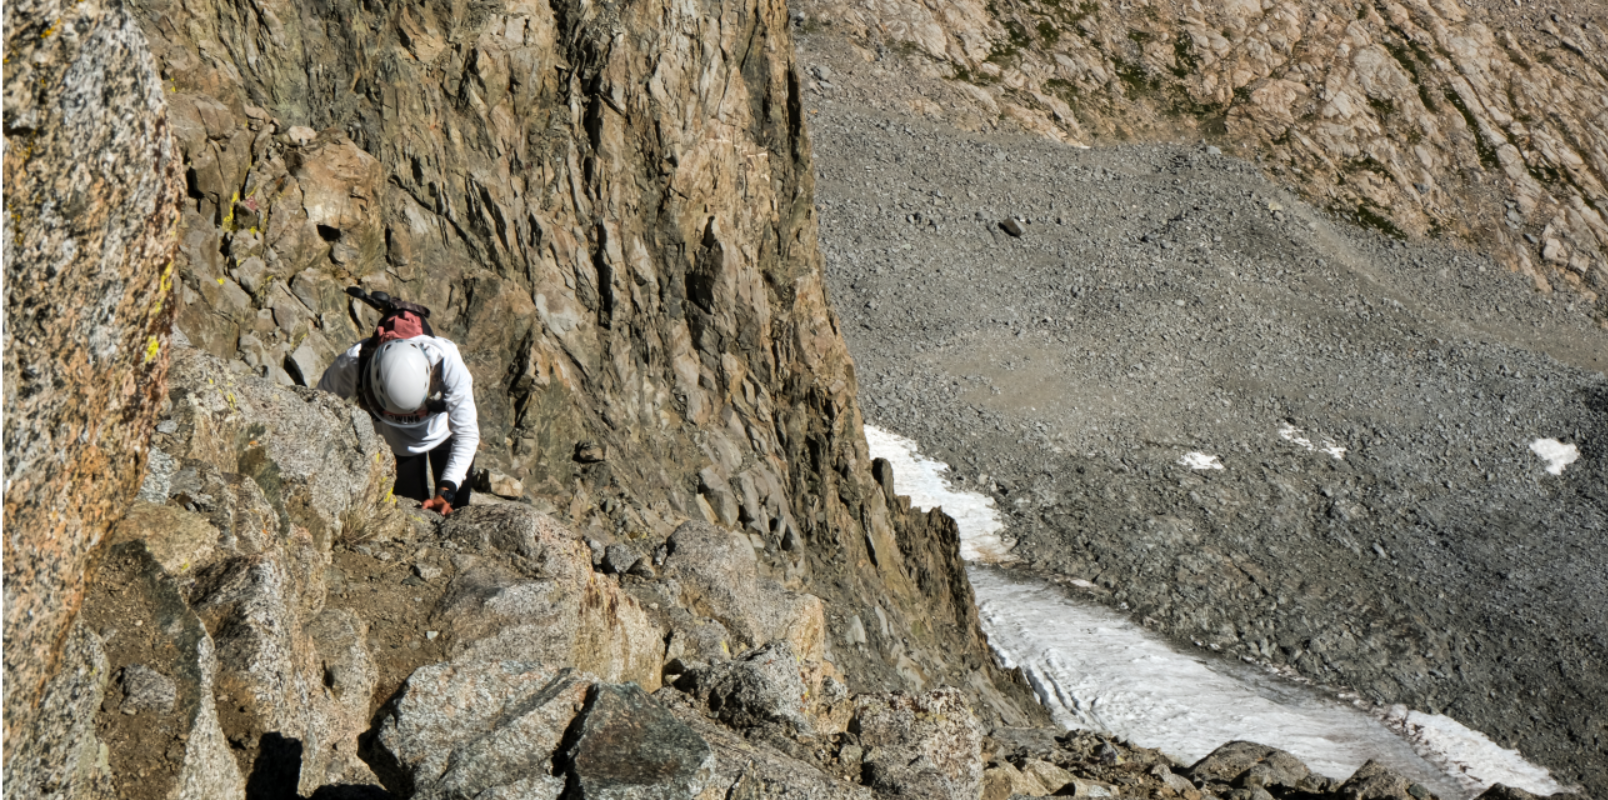
The approaching bad weather forced us to get moving early on our final expedition day. We woke up at 2am, both complaining about very poor sleep due to the 3’700m altitude, and headed out into the darkness just moments later. Navigating through Williamson bowl, interrupted by multiple cliff-bands and lakes, was difficult; especially in the dark. Progress is slow, as big boulders have to be surmounted all along the way. We were happy to finally reach the foot of the 500m long chute connecting Williamson bowl to the infamous chimney, a roughly 20m long climbing section, undoubtedly the crux of the route. The rock was very loose and the chute felt infinitely long.
When the sky started brightening up, we reached the foot of the chimney. Online reports were claiming that if this section was in Colorado, it would be rated 4th class (~T6), but since the Californians are used to these climbs, they would only rate it upper 3rd class (~T5), but still recommend taking along climbing shoes. Looking at it from up close, it seemed very doable: A 50cm wide chimney with lots of decent holds, breaks in between, and not a too steep gradient leads up to the summit plateau. In the light of our headlamps, we made our way up without major problems. Climbing in the chimney was sometimes a bit awkward, but not a single move felt comparable to what we climbed on Mount Russell, Mount Muir, and Middle Palisade.
Exiting the chimney was one of the most beautiful moments of this trip. From the dark west-side of the mountain, you are suddenly faced with a beautiful sunrise unfolding on the other side. We perfectly timed our climb to arrive on the summit the moment the sun rose.
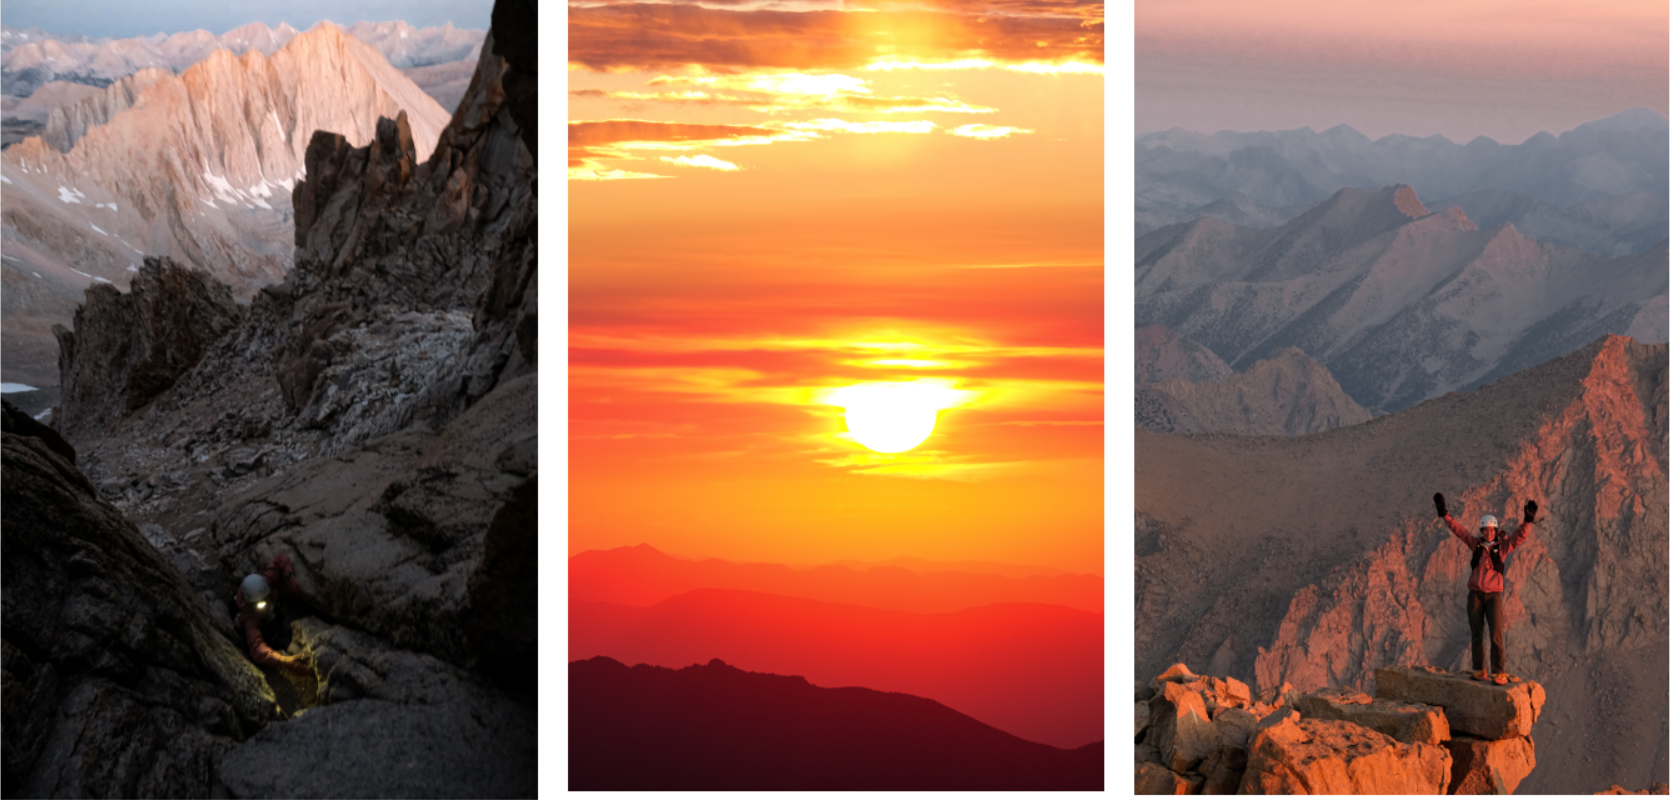
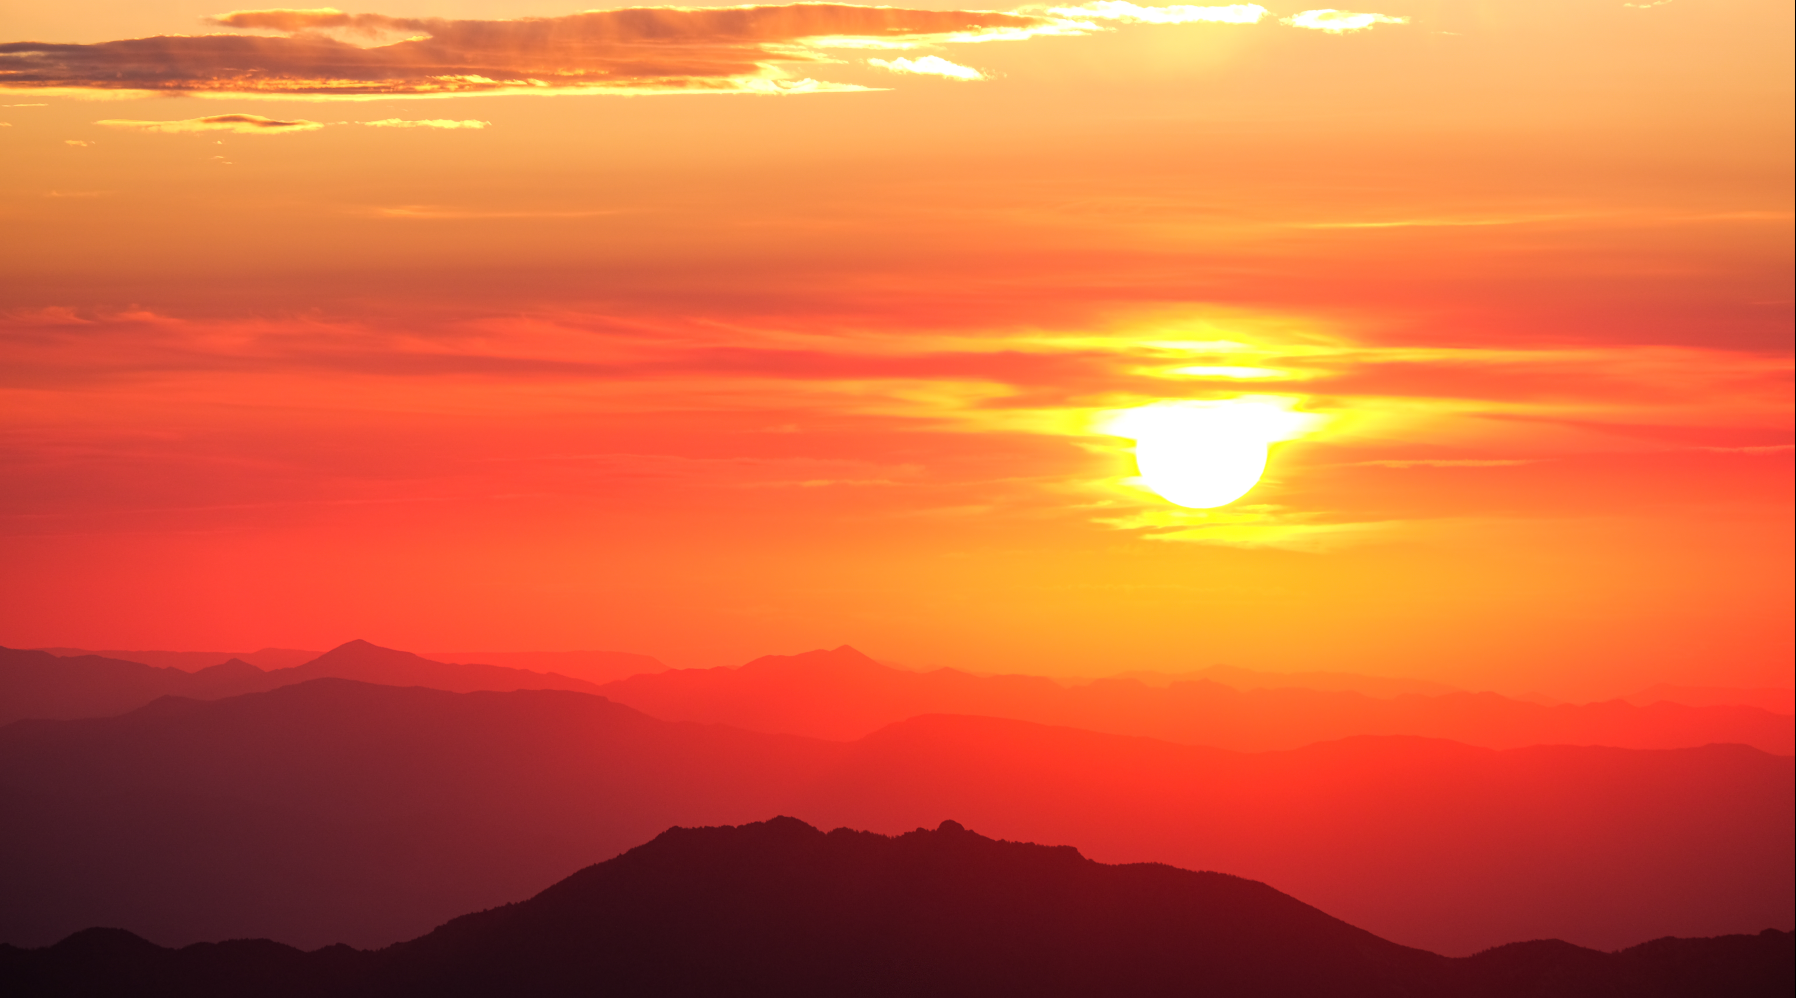
The beautiful red colors induced by the clouds gathering to unleash a massive thunderstorm in the afternoon were something I have never seen before and made the mountains look as if they were bleeding.
After playing around in the beautifully colored rocks for a while, we reminded ourselves that we should quickly get back to camp and off the mountains to avoid being caught in a thunderstorm. Back down in Williamson bowl, we crossed two other groups, one of them equipped rather sparingly. It would take them another three hours to get to the summit and eight to be back down at the trailhead. Should we have warned them about the approaching weather, as did the guy the previous day? They certainly would not have cared. But when we got down to our car shortly after lunch and after a long but cheerful descent, we looked back up and saw dark cloud accumulating and light rain setting in. When we drove away, the thunderstorm unfolded and sent a literal wall of rain upon these mountains. We hope the people were safe.

28km | 1’500m+ | 12h GPX Strava
| Endurance | ★★★☆☆ | Exposure | ★★★☆☆ |
| Technique | ★★★☆☆ | Route-finding | ★★★☆☆ |
| Encounters | 5 people | Global difficulty | T5/3a |
Conclusion
In many ways, the Sierra’s 14ers surprised me. When compared to the Alps’ 4000ers, they are much more welcoming: There is basically no natural rock fall, the weather is very stable, the temperatures are pleasant, there is little glacier travel, and the rock is typically firm. However, many aspects also make it much harder to climb them: The lack of hiking paths once you go higher, the tricky navigation because of the few obvious terrain features, the absence of huts or shelters, and the violence of thunderstorms, once they start. I loved the process of doing research about the different mountains and planning out a way to efficiently link them up in less than a week. The fact that we were able to realize all projects we have set out to do is a testament to how strong Nathalie and I are as a team. Thank you!
Technically, Split Mountain is located a few kilometers south of Middle Palisade, but since its trailhead cannot be reached without a car with high clearance, we could not reach it. ↩